Getting Started with Aperture
Aperture is available as a managed service, Aperture Cloud, or can be self-hosted within your infrastructure.
1. Sign up to Aperture Cloud
For signing up, head over to Aperture Cloud. For detailed instructions, refer to our step-by-step guide.
2. Pick your Integration
These are two main modes on how to get started with Aperture.
- Aperture Serverless
- Aperture for Infrastructure
The Serverless mode is the quickest way to start using Aperture.


3. Get your API key
In Aperture Cloud, authentication for SDK integrations is handled using API keys. These keys can be found in the Aperture Cloud UI. For detailed instructions on locating API Keys, refer to the API Keys section.
4. Install SDK and Define Control Points
Aperture provides SDKs for various languages. You can find the SDKs and installation instructions here.
- TypeScript
- Python
- Go
npm install @fluxninja/aperture-js
pip install aperture-py
go get github.com/fluxninja/aperture-go/v2
Connect to Aperture Cloud by creating an Aperture Client with your organization's address and API Key.
- TypeScript
- Python
- Go
import { ApertureClient } from "@fluxninja/aperture-js";

// Create aperture client
export const apertureClient = new ApertureClient({
  address: "ORGANIZATION.app.fluxninja.com:443",
  apiKey: "API_KEY",
});
from aperture_sdk.client import ApertureClient, FlowParams


agent_address = os.getenv("APERTURE_AGENT_ADDRESS", default_agent_address)
api_key = os.getenv("APERTURE_API_KEY", "")
insecure = os.getenv("APERTURE_AGENT_INSECURE", "true").lower() == "true"

aperture_client = ApertureClient.new_client(
    address=agent_address, insecure=insecure, api_key=api_key
)
// grpcOptions creates a new gRPC client that will be passed in order to initialize the Aperture client.
func grpcOptions(insecureMode, skipVerify bool) []grpc.DialOption {
	var grpcDialOptions []grpc.DialOption
	grpcDialOptions = append(grpcDialOptions, grpc.WithConnectParams(grpc.ConnectParams{
		Backoff:           backoff.DefaultConfig,
		MinConnectTimeout: time.Second * 10,
	}))
	grpcDialOptions = append(grpcDialOptions, grpc.WithUserAgent("aperture-go"))
	if insecureMode {
		grpcDialOptions = append(grpcDialOptions, grpc.WithTransportCredentials(insecure.NewCredentials()))
	} else if skipVerify {
		grpcDialOptions = append(grpcDialOptions, grpc.WithTransportCredentials(credentials.NewTLS(&tls.Config{
			InsecureSkipVerify: true, //nolint:gosec // For testing purposes only
		})))
	} else {
		certPool, err := x509.SystemCertPool()
		if err != nil {
			return nil
		}
		grpcDialOptions = append(grpcDialOptions, grpc.WithTransportCredentials(credentials.NewClientTLSFromCert(certPool, "")))
	}
	return grpcDialOptions
}
opts := aperture.Options{
		Address:     apertureAgentAddress,
		DialOptions: grpcOptions(apertureAgentInsecureBool, apertureAgentSkipVerifyBool),
	}

	// initialize Aperture Client with the provided options.
	apertureClient, err := aperture.NewClient(ctx, opts)
	if err != nil {
		log.Fatalf("failed to create client: %v", err)
	}
Define a Control Point
Once the SDK is connected to Aperture Cloud, you can create a feature control point anywhere within your code. For example, before executing the business logic of a specific API, you can create a feature control point that can control the execution flow of the API and can reject the request based on the policy defined in Aperture.
Let's create a feature control point in the following code snippet.
- TypeScript
- Python
- Go
The code snippet below shows how to wrap your
Control Point within the StartFlow call while
also passing labels to Aperture Agents.
- The function
Flow.ShouldRun()checks if the flow allows the request. - The
Flow.End()function is responsible for sending telemetry.
async function handleRequestRateLimit(req: Request, res: Response) {
  const flow = await apertureClient.startFlow("awesomeFeature", {
    labels: {
      limit_key: "some_user_id",
    },
    grpcCallOptions: {
      deadline: Date.now() + 300, // ms
    },
  });

  if (flow.shouldRun()) {
    // Add business logic to process incoming request
    console.log("Request accepted. Processing...");
    const resString = "foo";
    res.send({ message: resString });
  } else {
    console.log("Request rate-limited. Try again later.");
    // Handle flow rejection
    flow.setStatus(FlowStatus.Error);
    res.status(429).send({ message: "Too many requests" });
  }

  flow.end();
}
The code snippet below shows how to wrap your
Control Point within the start_flow call while
passing labels to Aperture.
labels = {
        "userId": "some_user_id",
        "userTier": "gold",
        "priority": "100",
    }
    flow_params = FlowParams(
        check_timeout=timedelta(seconds=400),
        explicit_labels=labels,
    )
    flow = aperture_client.start_flow(
        control_point="rate-limiting-feature",
        params=flow_params,
    )

    if flow.should_run():
        print("Request accepted. Processing...")
    else:
        print("Request rate-limited. Try again later.")
        flow.set_status()

    flow.end()
    #Simulate work being done
    await asyncio.sleep(1)
// business logic produces labels
	labels := map[string]string{
		"userId":   "some_user_id",
		"userTier": "premium",
		"priority": "100",
	}


	flowParams := aperture.FlowParams{
		Labels:   labels,
		RampMode: false,
	}


	flow := a.apertureClient.StartFlow(r.Context(), "featureName", flowParams)
	// StartFlow performs a flowcontrolv1.Check call to Aperture Agent. It returns a Flow object.


	// See whether flow was accepted by Aperture Agent.
	if flow.ShouldRun() {

		// do actual work

		log.Println("Flow Accepted Processing work")
		w.WriteHeader(http.StatusAccepted)
	} else {
		// handle flow rejection by Aperture Agent
		log.Println("Flow Rejected")
		flow.SetStatus(aperture.Error)
		w.WriteHeader(http.StatusForbidden)
	}

	endResponse := flow.End()
	if endResponse.Error != nil {
		log.Printf("Failed to end flow: %+v", endResponse.Error)
	}

	log.Printf("Flow ended with response: %+v", endResponse.FlowEndResponse)
This is how you can create a feature control point in your code. The complete example is available here.
5. Create Your Policy
Within the Aperture UI, navigate to the policy in tab in the sidebar menu, and
click the Create Policy button in the upper-right corner. There you can pick
the blueprint that best aligns with your needs. After a few clicks, you'll be
directed to a screen where you can input the necessary parameters to generate
the policy.

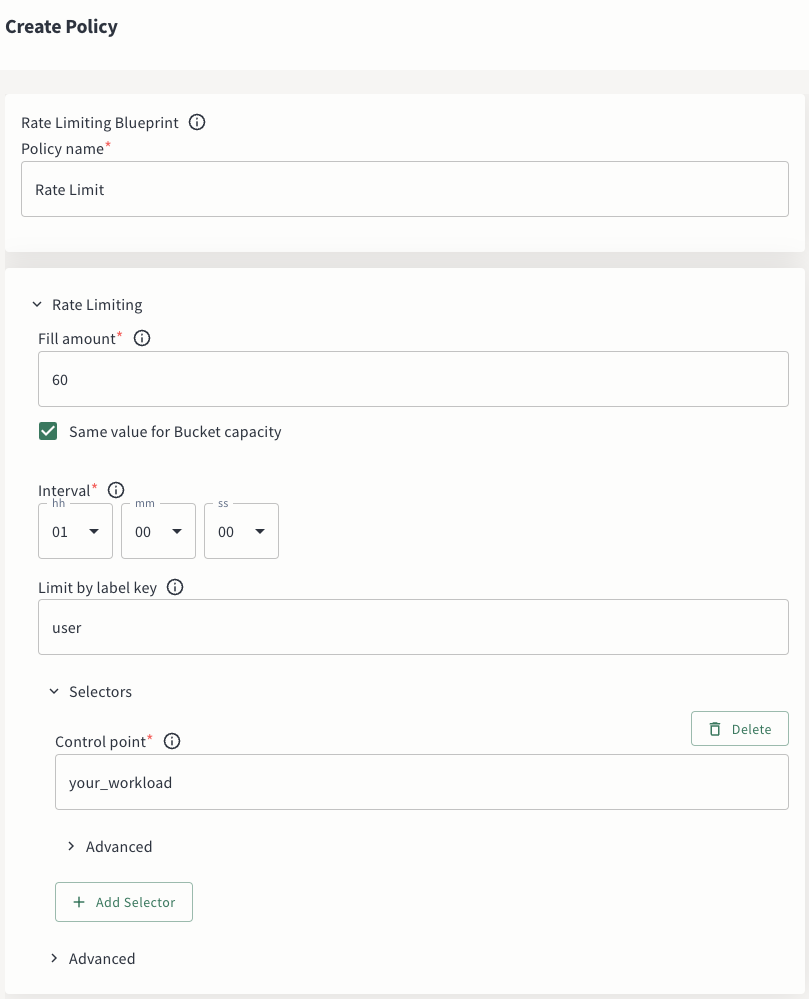
For more details on how to create a policy, follow our step-by-step guide.
There are two ways to integrate Aperture into your infrastructure. The first option includes a cloud-hosted controller and self-managed agents to ensure minimal performance impact. The second option involves hosting Aperture entirely within your infrastructure, making it perfect for air-gapped environments.
3. Set Up the Environment
The Aperture Agent can be installed in various modes. For installation steps, see Agent docs under Aperture For Infrastructure.
For more details on fully self-hosted installation, refer to the Self-hosted section.
4. Integrate with Aperture
Here are various Integrations methods with Aperture
5. Map to Aperture SaaS Controller
Aperture Cloud authenticates requests from integrations using API keys, which are created for your project and can be found within the Aperture Cloud UI. Copy the API key and save it in a secure location. This key will be used during the configuration of Self-hosted Agents. For detailed instructions on locating API Keys, refer to the API Keys section.
Using the API key, you can map your integration to the Aperture Cloud. See FluxNinja Cloud Extension for more details.
6. Create Your Policy
For more details on how to create a policy, follow our step-by-step guide.