Managing OpenAI API Rate Limits
Understanding OpenAI rate limits
OpenAI imposes fine-grained rate limits on both requests per minute and tokens per minute for each AI model they offer. For example:
| Model | Tokens per minute | Requests per minute |
|---|---|---|
| gpt-3.5-turbo | 90000 | 3500 |
| gpt-3.5-turbo-16k | 180000 | 3500 |
| gpt-4 | 40000 | 200 |
Dealing with these limits can be tricky, as API calls to OpenAI have high latency (several seconds). As the rate limits are quite aggressive, back-off and retry loops run for several minutes before a request can be successfully sent to OpenAI. When working with OpenAI APIs, request prioritization can be quite beneficial to ensure that the most important requests are sent to OpenAI first.
Managing OpenAI rate limits with Aperture
Aperture can help manage OpenAI rate limits and improve user experience by queuing and prioritizing requests before sending them to OpenAI. Aperture offers a blueprint for managing quotas, consisting of two main components:
- Rate limiter: OpenAI employs a token bucket algorithm to impose rate limits,
and that is directly compatible with Aperture's rate limiter. For example, in
the tokens per minute policy for
gpt-4, we can allocate a burst capacity of40000 tokens, and a refill rate of40000 tokens per minute. The bucket begins to refill the moment the tokens are withdrawn, aligning with OpenAI's rate-limiting mechanism. This ensures our outbound request and token rate remains synchronized with OpenAI's enforced limits. - Scheduler: Aperture has a weighted fair queuing scheduler that prioritizes the requests based on multiple factors such as the number of tokens, priority levels and workload labels.
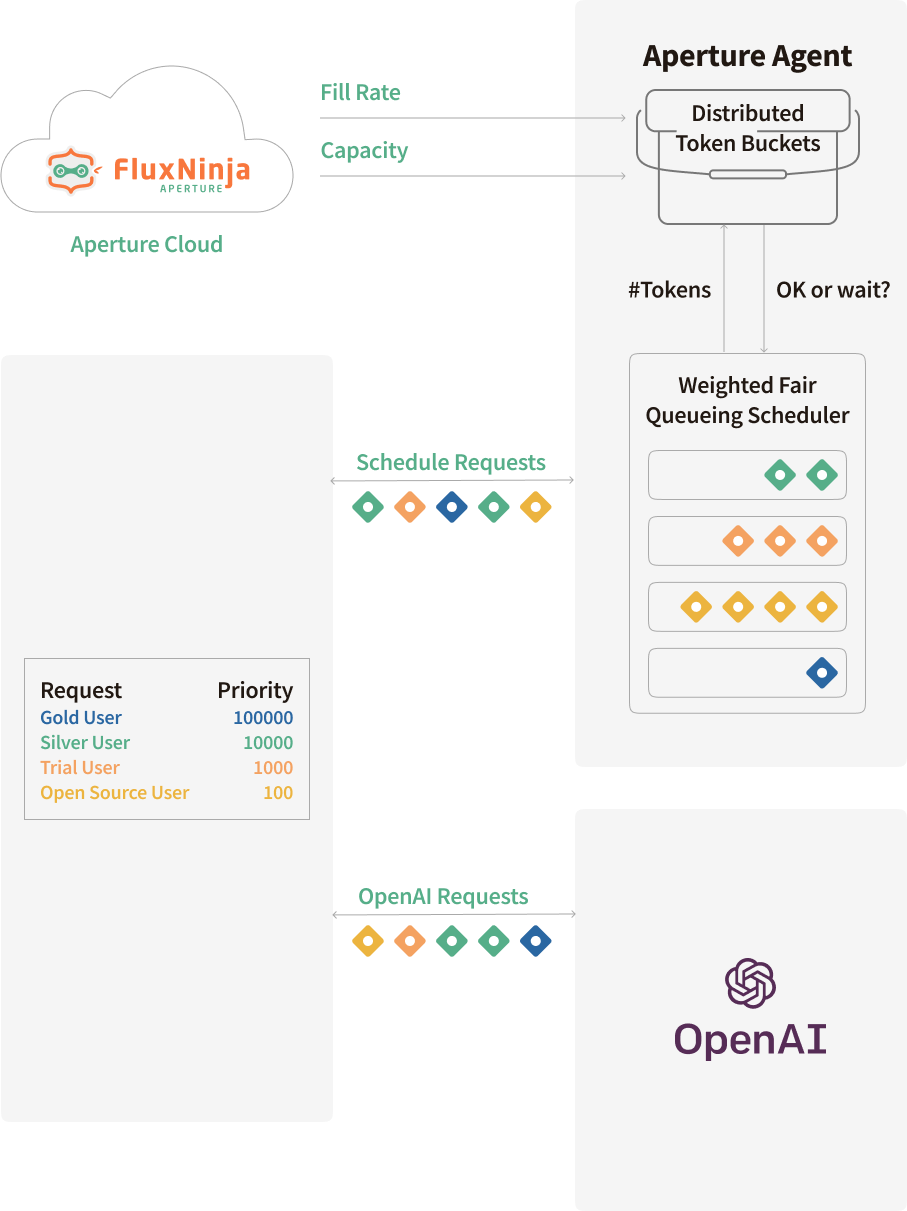
The graph above shows how requests are scheduled using Aperture, based on priorities and other critical business labels, which will be shown in the upcoming code snippets. Scheduled requests are either executed immediately if they are high priority, or queued if they are of lower priority, specially when nearing OpenAI's rate limits.
Configuration
Refer to the get started guide to pick the appropriate method of integration with Aperture.
Before creating a policy, a control point needs to be defined. Control Point specifies where the policy should apply the decisions. There are multiple ways to achieve this; for the scope of this guide, a JavaScript SDK is used to create a control point—check out the Control Point Concept & Integrations section for more details.
Control Point with JavaScript SDK
The Aperture JavaScript SDK allows you to set a control point manually. How an Aperture Client instance is created is not discussed in this guide; detailed information around SDK integration can be found in Manually setting feature control points using JavaScript SDK.
The code below provides a general idea of control point creation and setting labels.
Integration with Aperture TypeScript SDK
Let's understand the code snippet above; we are creating a control point named
openai and setting the labels, which will be used by the policy to identify
and schedule the request. Before calling OpenAI, we rely on Aperture Agent to
gate the request using the StartFlow method. To provide more context to
Aperture, we also attach the following labels to each request:
model_variant: This specifies the model variant being used (gpt-4,gpt-3.5-turbo, orgpt-3.5-turbo-16k). Requests and tokens per minute rate limit policies are set individually for each model variant.api_key- This is a cryptographic hash of the OpenAI API key, and rate limits are enforced on a per-key basis.estimated_tokens: As the tokens per minute quota limit is enforced based on the estimated tokens for the completion request, we need to provide this number for each request to Aperture for metering. Following OpenAI's guidance, we calculateestimated_tokensas(character_count / 4) + max_tokens. Note that OpenAI's rate limiter doesn't tokenize the request using the model's specific tokenizer but relies on a character count-based heuristic.priority: Requests are ranked according to a priority number provided in this label. For example, requests frompaid_usercan be given precedence over those fromtrial_userandfree_userin example code.
In the startFlow call, it's important to define the gRPC deadline. This
parameter sets limit for how long a request can remain queued. In our case, a
deadline of 120000 milliseconds means the request might stay in the queue for
up to 20 minutes. After this interval, the request will either be processed or
discarded, depending on its position in the queue.
Policies
You can generate a policy using quota scheduler blueprint, either via Aperture
Cloud UI, or aperturectl command line interface.
- Aperture Cloud UI
- aperturectl (Aperture Cloud)
Follow these steps to create a policy using the quota scheduler blueprint in Aperture Cloud UI:
- Navigate to the
Policiestab in the sidebar menu within your organization. - Click
Create Policyin the top right corner. - Select the
Request Prioritizationtab and click on the dropdown menu. - Choose
Quota Based, once there, complete the form to create your quota scheduling policy.
Following are the fields that need to be adjusted to match the application requirements -
Policy name: Name of the policy — This value should be unique and required.Bucket Capacity: This value defines burst capacity. For example, in the case ofgpt-4tokens per minute policy, the bucket will have a capacity of40000 tokens.Fill amount: After the tokens are consumed, the bucket will be filled with this amount. For example, in the case ofgpt-4tokens per minute policy, the bucket will fill at40000 tokens per minute.Interval: It specifies the time duration in whichfill_amountis applied.Limit by label key: This field specifies the label that is used to determine the unique token bucket. It is set toapi_keymeaning that a token bucket would get initiated for each OpenAI key.Priority label key: This field specifies the label that is used to determine the priority. It is set topriorityin the policy and SDK code example.Tokens label key: This field specifies the label that is used to determine tokens. It is set toestimated_tokensin the policy and SDK code example.Workload label key: This field specifies the label that is used to determine the workload. It is set toproduct_reasonin the policy and SDK code example.
Selector parameters allow filtering of the requests to ensure where the policy will act on.
Selectors:Control Point: Control point name to match the request against. In this case, it will beopenai.Label matcher:match_labels: Labels to match the request against. It is optional.
If you haven't installed aperturectl yet, begin by following the
Set up CLI (aperturectl) guide. Once
aperturectl is installed, generate the values file necessary for creating
the quota scheduling policy using the command below:
aperturectl blueprints values --name=quota-scheduling/base --output-file=gpt-4-tpm-values.yaml
Following are the fields that need to be adjusted to match the application requirements -
policy_name: Name of the policy — This value should be unique and required.bucket_capacity: This value defines burst capacity. For example, in the case ofgpt-4tokens per minute policy, the bucket will have a capacity of40000 tokens.fill_amount: After the tokens are consumed, the bucket will be filled with this amount. For example, in the case ofgpt-4tokens per minute policy, the bucket will fill at40000 tokens per minute.rate_limiter:interval: It specifies the time frequency at whichfill_amountis applied.limit_by_label_key: This field specifies the label that is used to determine the unique token bucket. It is set toapi_keymeaning that a token bucket would get initiated for each OpenAI key.
The scheduler helps prioritize the requests based on the labels and priority
defined. In this case, we are using the priority label, which is being passed
by Aperture SDK in code, containing the priority of the request.
scheduler:priority_label_key: This field specifies the label that is used to determine the priority. It is set topriorityin the policy and SDK code example.tokens_label_key: This field specifies the label that is used to determine tokens. It is set toestimated_tokensin the policy and SDK code example.workload_label_key: This field specifies the label that is used to determine the workload. It is set toproduct_reasonin the policy and SDK code example.
Selector parameters allow filtering of the requests to ensure where the policy will act on.
selectors:control_point: Control point name to match the request against. In this case, it will beopenai.label_matcher:match_labels: Labels to match the request against. It is optional.
Below are examples of values file adjusted to match the SDK code snippet & control point labels.
Client-side quota management policies for gpt-4
Apply Policy
- Aperture Cloud UI
- aperturectl (Aperture Cloud)
After entering all required values, click Continue followed by Apply Policy
in the bottom right corner.
aperturectl cloud blueprints apply --values-file=gpt-4-tpm.yaml
Policy in Action
Once the policy is activated, it will begin to ensure that API requests conform to OpenAI's rate limits, prioritizing requests based on the workload types defined in the policy. These workloads are matched with the labels that the SDK passes to Aperture, where paid users are prioritized over trial users, and trial users over free users, thereby establishing a baseline experience for each tier.
Should rate limits be exhausted, Aperture will schedule the requests, placing
them in a queue until either the bucket is reset or a token becomes available.
Requests will remain in the queue up to the specified timeout value, provided in
the StartFlow function. There is no minimum waiting time for requests; as soon
as tokens are available, requests will be forwarded to OpenAI. A request can be
transmitted to OpenAI as soon as it reaches the application, or it can wait
until the timeout.
Monitoring the Policy and OpenAI Performance
Aperture Cloud provides comprehensive observability of the policy and OpenAI performance, providing a granular view of each workload, such as paid, trial, and free.
The image below shows the incoming token rate and the accepted token rate for
the gpt-4 tokens-per-minute policy. We can observe that the incoming token
rate is spiky, while the accepted token rate remains smooth and hovers around
666 tokens per second. This roughly translates to 40,000 tokens per minute.
Essentially, Aperture is smoothing out the fluctuating incoming token rate to
align it with OpenAI's rate limits.

 Incoming and Accepted Token Rate for gpt-4
The below image shows request prioritization metrics from the Aperture Cloud console during the same peak load period:
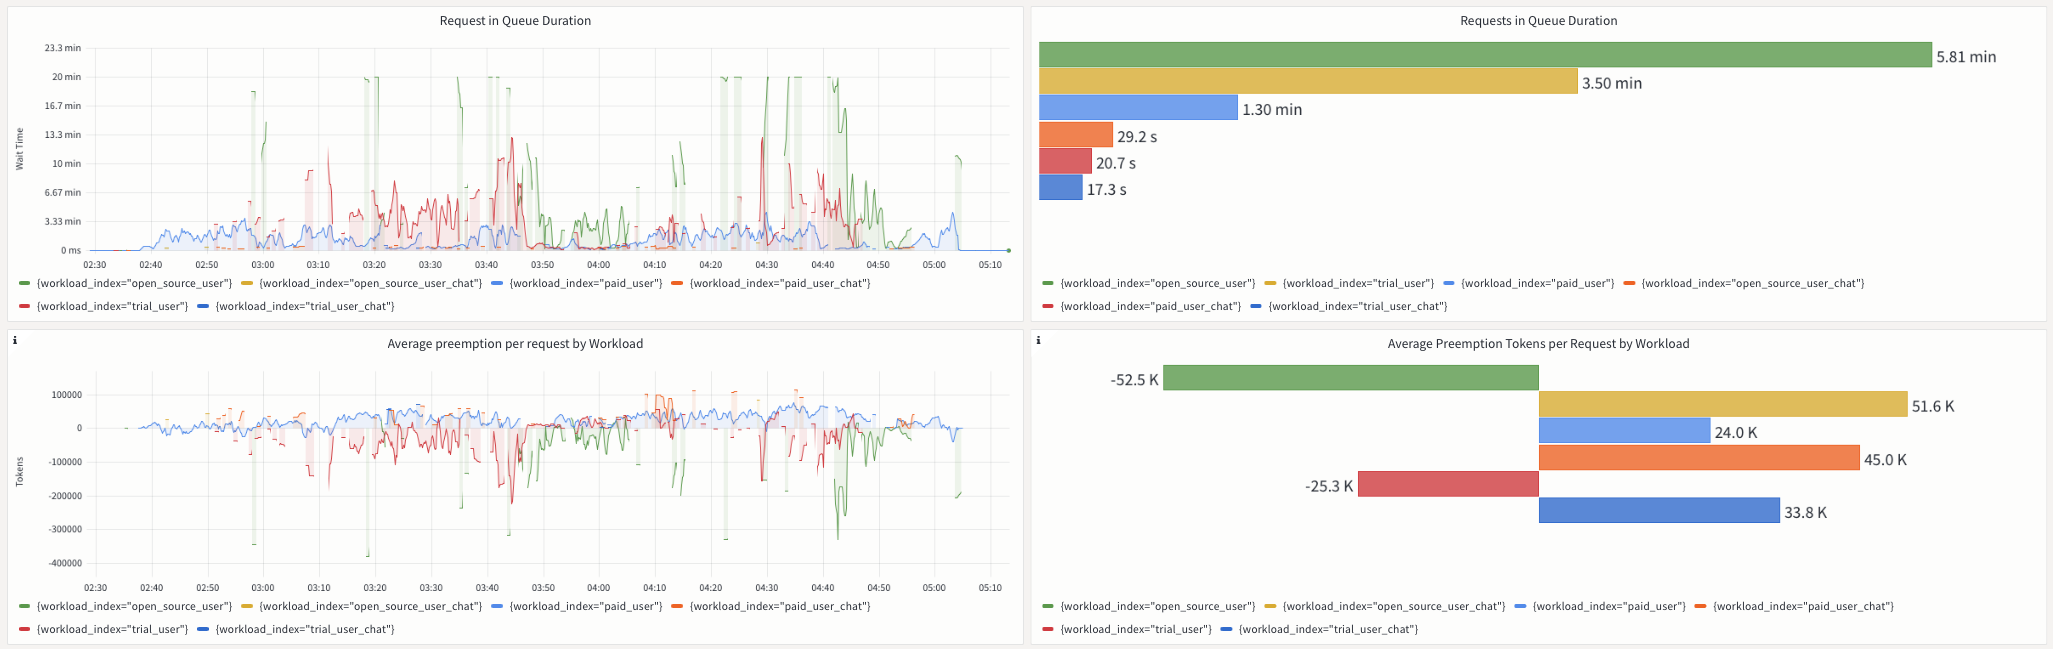
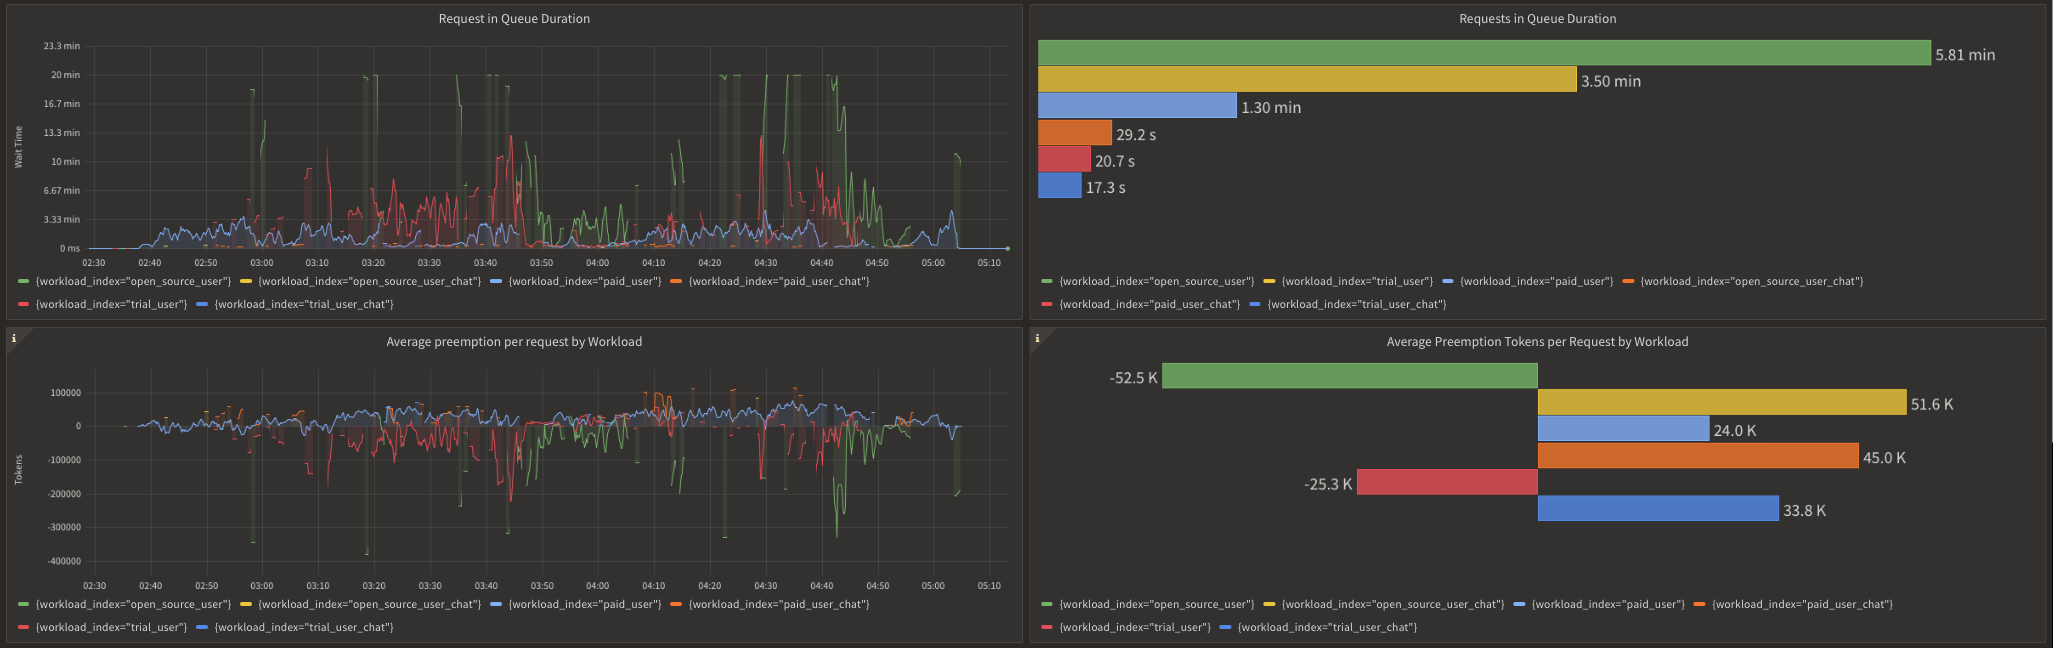 Prioritization Metrics for gpt-4
In the upper left panel of the metrics, noticeable peaks indicate that some requests got queued for several minutes in Aperture. We can verify that the trial and free-tier users tend to experience longer queue times compared to their paid counterparts and chat requests.
Queue wait times can fluctuate based on the volume of simultaneous requests in each workload. For example, wait times are significantly longer during peak hours as compared to off-peak hours. Aperture provides scheduler preemption metrics to offer further insight into the efficacy of prioritization. As observed in the lower panels, these metrics measure the relative impact of prioritization for each workload by comparing how many tokens a request gets preempted or delayed in the queue compared to a purely First-In, First-Out (FIFO) ordering.
In addition to effectively managing the OpenAI quotas, Aperture provides
insights into OpenAI API performance and errors. The graphs below show the
overall response times for various OpenAI models we use. We observe that the
gpt-4 family of models is significantly slower compared to the gpt-3.5-turbo
family of models.
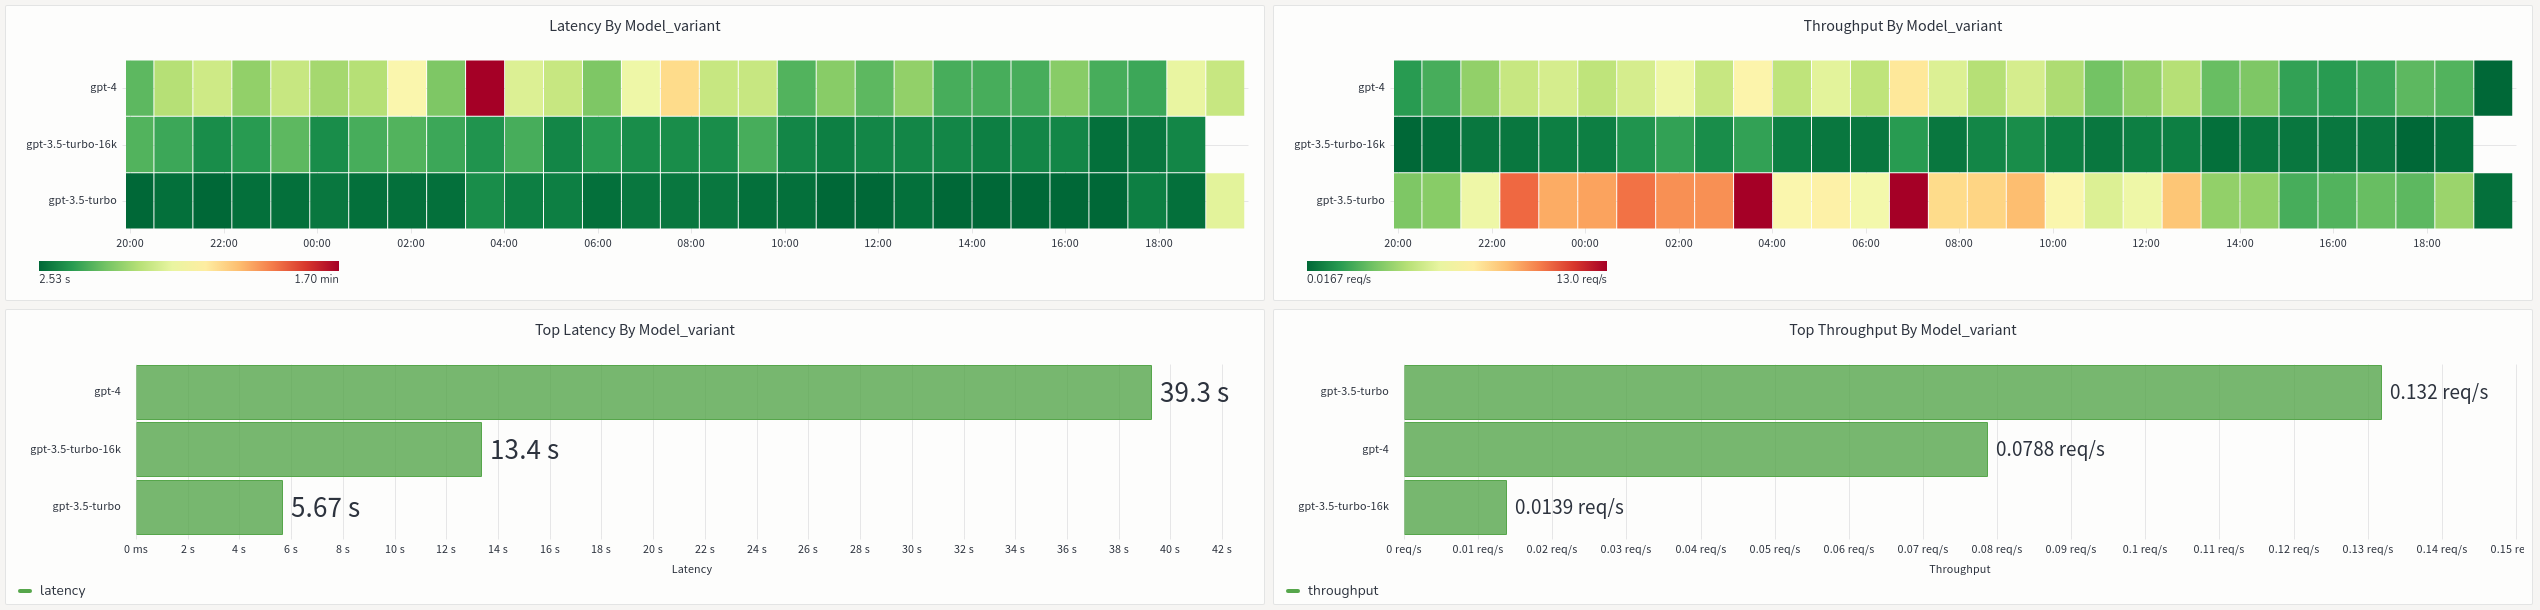
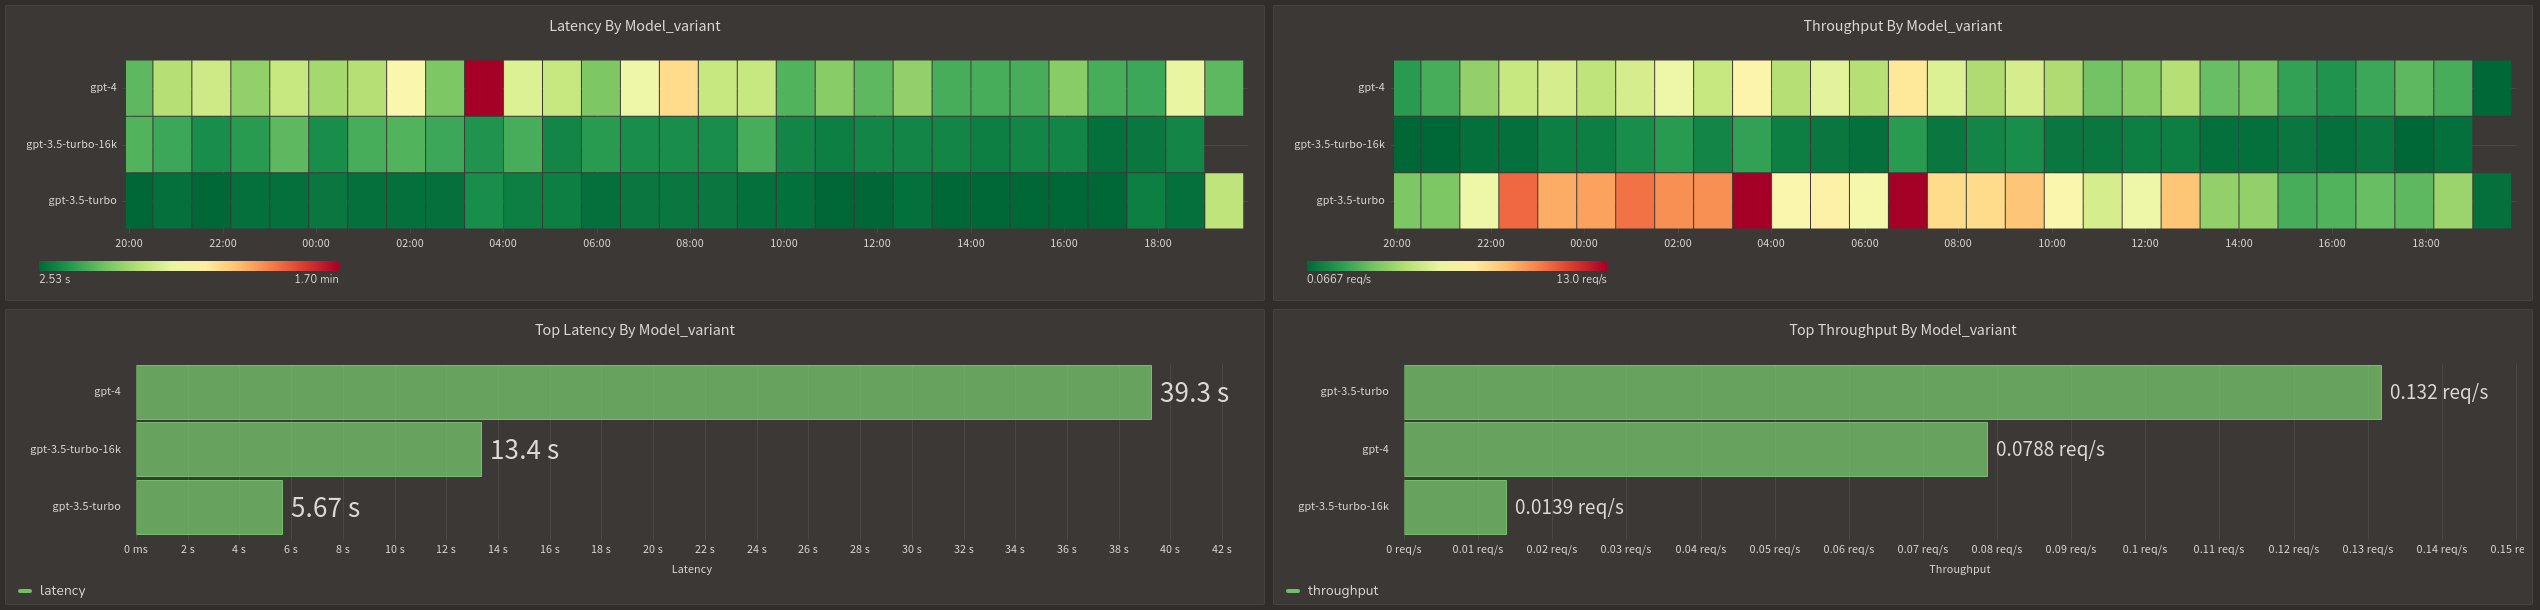 Performance Metrics for OpenAI Models