Concurrency Scheduling in Mistral
Mistral AI
Mistral is an open-source Large Language Model (LLM) used by numerous companies to develop AI-driven applications. Its open-source framework enables diverse implementation strategies, ranging from productizing Mistral as a service to running it locally for computation and feature development. However, one common challenge faced in all use cases is the limitation posed by GPUs, limiting its full potential.
Such constraints, combined with an increase in demand, often result in slower response times to prompts, which leads to degradation of user experience during peak loads.
Aperture handles peak loads and preserves the user experience with the Concurrency Scheduling feature by efficiently scheduling in-flight requests directed to Mistral. This guide will provide detailed instructions on how to use the Aperture SDK when interfacing with Mistral, and define a concurrency scheduling policy using Aperture Cloud.
Schedule Requests in Mistral with Aperture
Aperture can help schedule in-flight requests and improve user experience by queuing and prioritizing requests that are sent to Mistral. Aperture offers a blueprint for concurrency scheduling, consisting of two main components:
- Concurrency Limiter: It allows setting the max number of concurrent requests that can be processed. This parameter can be set according to an application's ability to handle the maximum number of concurrent requests at a given time.
- Scheduler: Aperture has a weighted fair queuing scheduler that prioritizes the requests based on multiple factors such as the number of tokens, priority levels and workload labels.
The diagram provides an overview of concurrency scheduling in action, where the scheduler queues and prioritizes requests once the service limit is hit and keeps the count with a token counter.
Requests coming into the system are categorized into different workloads, each of which is defined by its priority and weight. This classification is crucial for the request scheduling process.
The scheduler priorities request admission based on the priority and weight assigned to the corresponding workload. This mechanism ensures that high-priority requests are handled appropriately even under high load.
Before exploring Aperture's concurrency scheduling capabilities, make sure that you have signed up to Aperture Cloud and set up an organization. For more information on how to sign up, follow our step-by-step guide.
Concurrency Scheduling with Aperture SDK
The first step to using the Aperture SDK is to import and set up Aperture Client:
- TypeScript
import { ApertureClient } from "@fluxninja/aperture-js";

// Create aperture client
export const apertureClient = new ApertureClient({
  address: "ORGANIZATION.app.fluxninja.com:443",
  apiKey: "API_KEY",
});
You can obtain your organization address and API Key within the Aperture Cloud
UI by clicking the Aperture tab in the sidebar menu.
The next step consists of setting up essential business labels to prioritize requests. For example, requests can be prioritized by user tier classifications:
- Typescript
const userTiers = {
    "platinum": 8,
    "gold": 4,
    "silver": 2,
    "free": 1,
};
The next step is making a startFlow call to Aperture. For this call, it is
important to specify the control point (mistral-prompt in our example) and the
labels that will align with the concurrency scheduling policy. The priority
label is necessary for request prioritization, while the workload label
differentiates each request.
According to the policy logic designed to limit the number of concurrent
requests sent to Mistral, Aperture will, on each startFlow call, either give
precedence to a critical request or queue a less urgent one when approaching API
limits. The duration a request remains in the queue is determined by the gRPC
deadline, set within the startFlow call. Setting this deadline to 120000
milliseconds, for example, indicates that the request can be queued for a
maximum of 2 minutes. After this interval, the request will be rejected.
Once the startFlow call is made, we send the prompt to Mistral and await for
its response. Excess requests are automatically queued by Aperture, eliminating
the need to check if a flow shouldRun or not.
- TypeScript
try {
  flow = await apertureClient.startFlow("mistral-prompt", {
      labels: {
          user_id: user,
          priority: priority.toString(),
          workload: `${tier} user`,
      },
      grpcCallOptions: {
          deadline: Date.now() + 120000, // ms
      },
  });

  const response = await fetch('http://localhost:11434/api/generate', {
      method: 'POST',
      headers: {
          'Content-Type': 'application/json'
      },
      body: requestBody
  });

  if (!response.ok) {
      throw new Error(`Error: ${response.status}`);
  }

  return response.text();
  } catch (error) {
      console.error('Error sending prompt to Mistral:', error);
  } finally {
      await flow?.end();
  }
It is important to make the end call after processing each request, to remove
in-flight requests and send telemetry data that would provide granular
visibility for each flow.
Create a Concurrency Scheduling Policy
- Aperture Cloud UI
- aperturectl
Navigate to the Policies tab on the sidebar menu, and select Create Policy
in the upper right corner. Next, choose the Rate Limiting blueprint, select
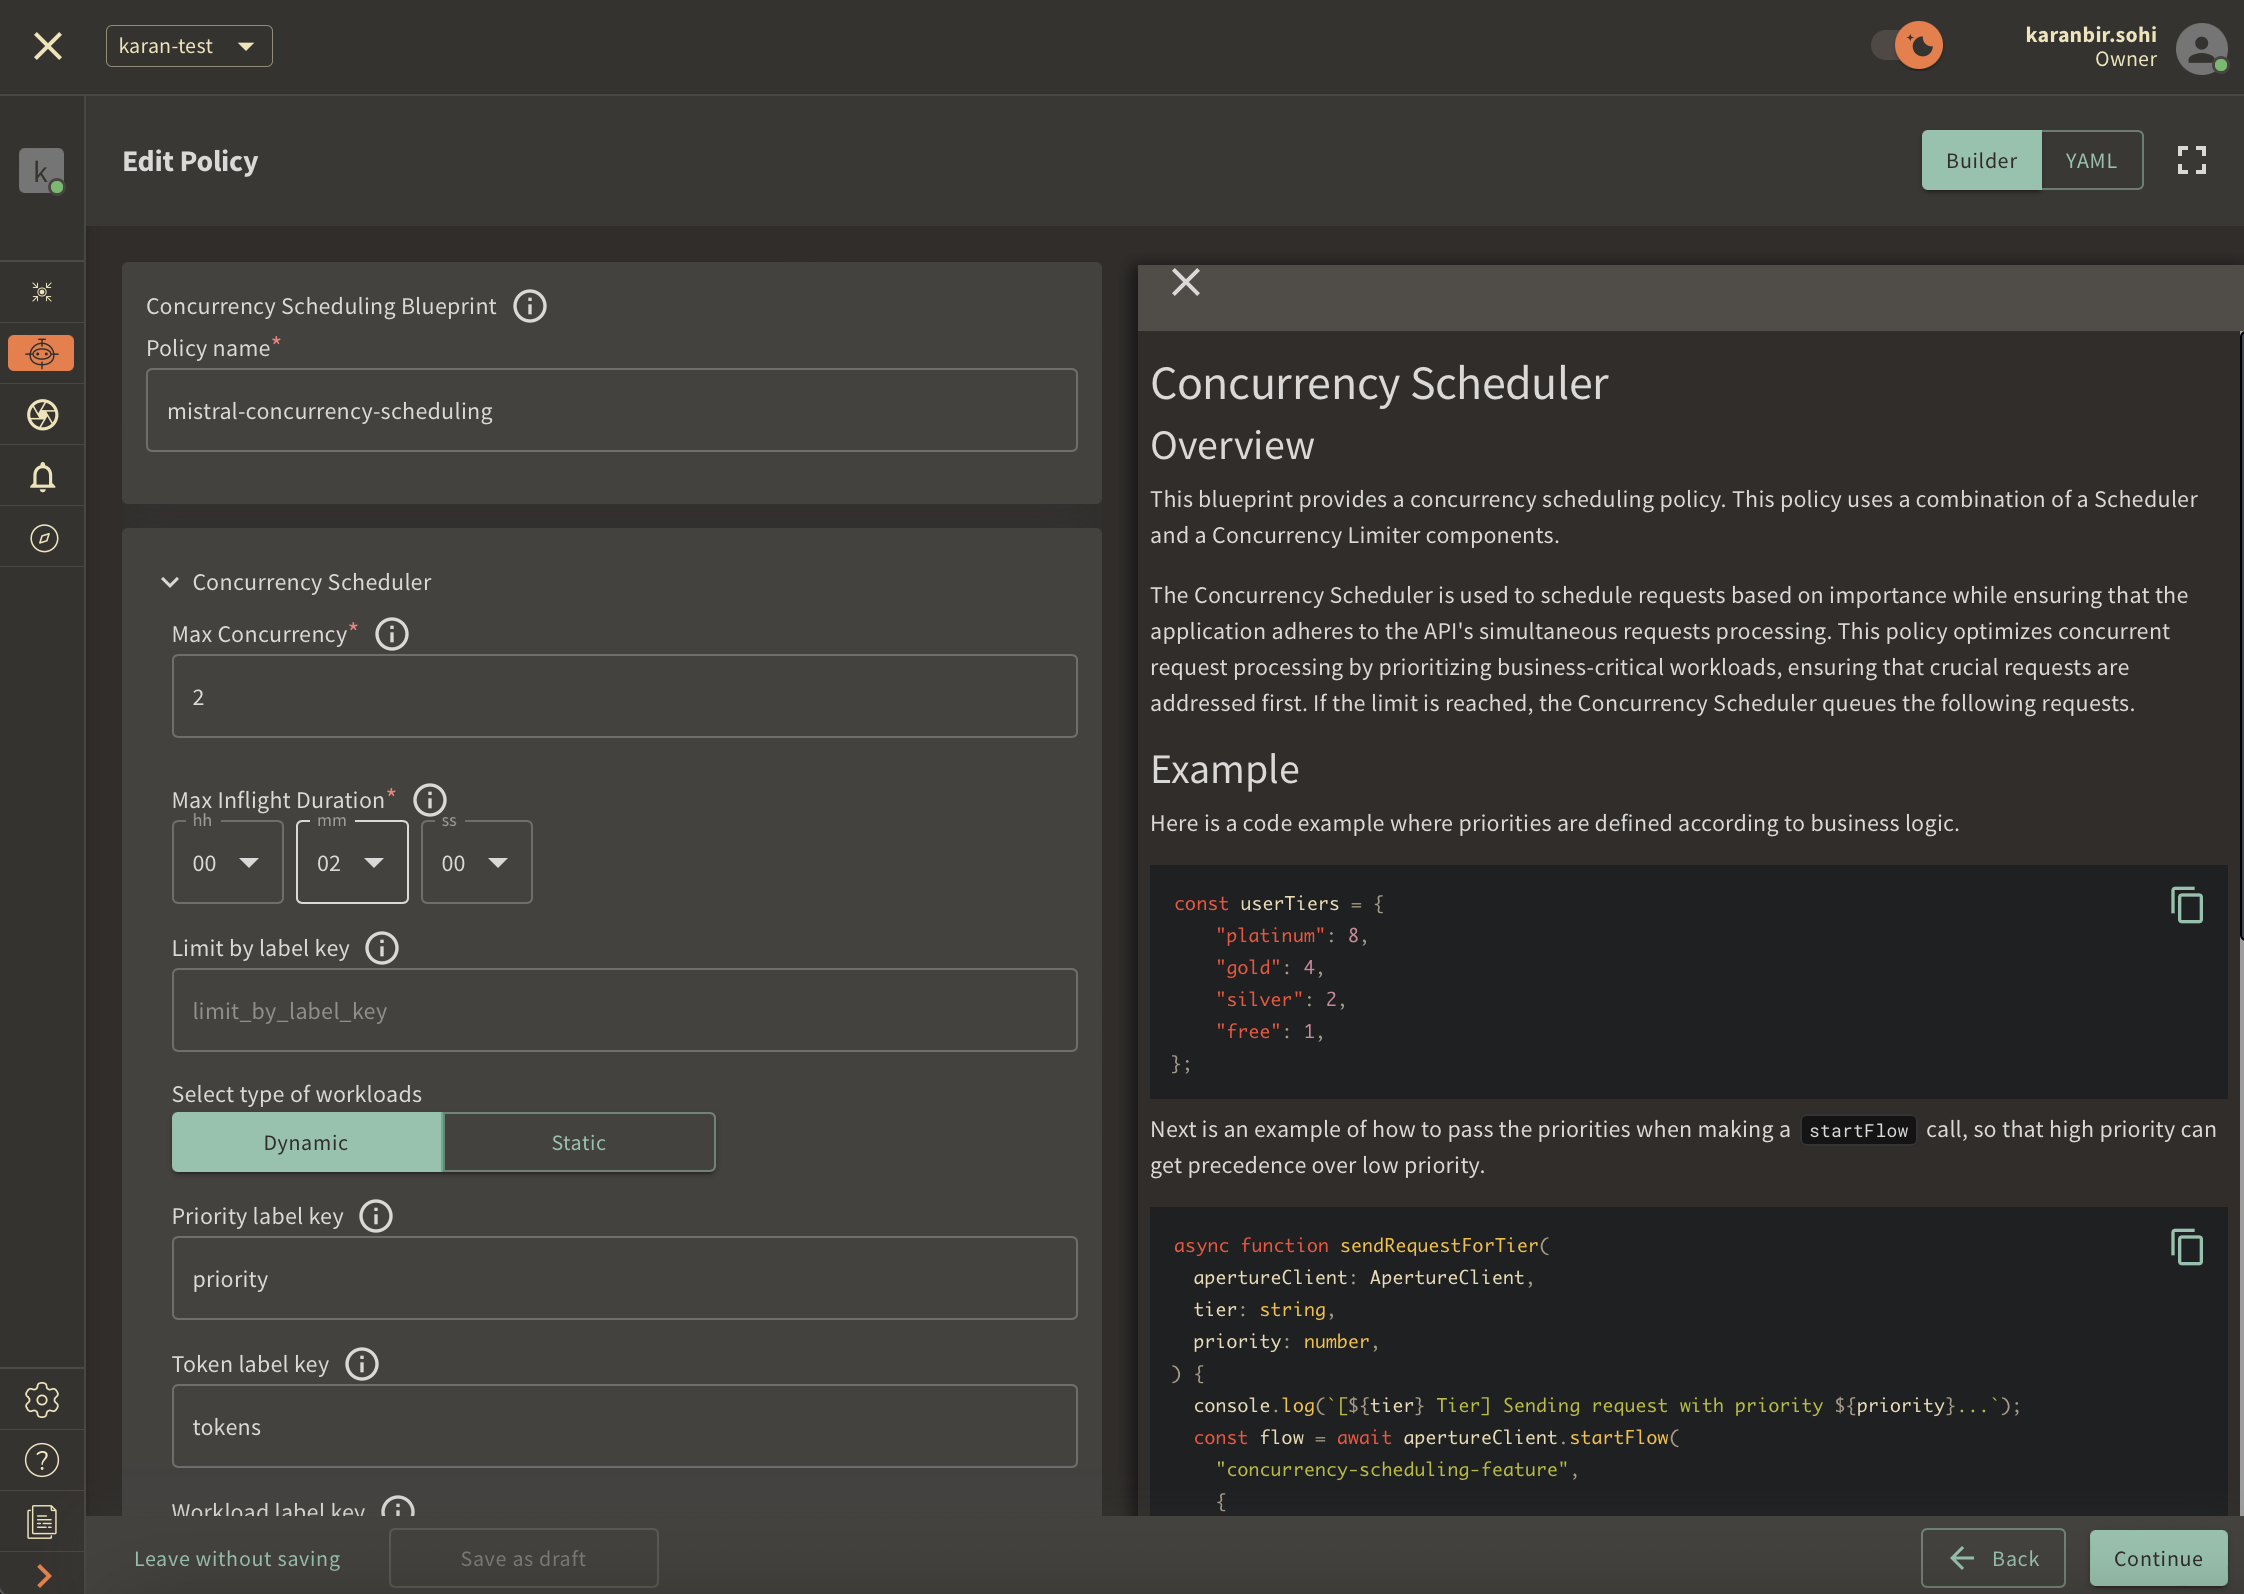
Concurrency and complete the form with these specific values:
Policy name: Unique for each policy, this field can be used to define policies tailored for different use cases. Set the policy name toconcurrency-scheduling-test.Limit by label key: Determines the specific label key used for concurrency limits. This parameter becomes essential for more granular concurrency limiting use cases like per-user limiting where a parameter such as theuser_idcan be passed. For now, we will test global concurrency limiting, we will leave the label as it is.Max inflight duration: Configures the time duration after which flow is assumed to have ended in case the end call gets missed. We'll set it to60sas an example.Max concurrency: Configures the maximum number of concurrent requests that a service can take. We'll set it to2as an example.Priority label key: This field specifies the label that is used to determine the priority. We will leave the label as it is.Tokens label key: This field specifies the label that is used to determine tokens. We will leave the label as it is.Workload label key: This field specifies the label that is used to determine the workload. We will leave the label as it is.Control point: It can be a particular feature or execution block within a service. We'll usemistral-promptas an example.
Once you've completed these fields, click Continue and then Apply Policy to
finalize the policy setup.
If you haven't installed aperturectl yet, begin by following the Set up CLI aperturectl guide. Once aperturectl is installed, generate the values file necessary for creating the concurrency scheduling policy using the command below:
aperturectl blueprints values --name=concurrency-scheduling/base --output-file=mistral-concurrency-scheduling.yaml
Following are the fields that need to be filled for creating a concurrency scheduling policy:
policy_name: Unique for each policy, this field can be used to define policies tailored for different use cases. Set the policy name toconcurrency-scheduling-test.limit_by_label_key: Determines the specific label key used for concurrency limits. This parameter becomes essential for more granular concurrency limiting use cases like per-user limiting where a parameter such as theuser_idcan be passed. For now, since we want to do a global concurrency limiting, we will leave the label as it is.max_inflight_duration: Configures the time duration after which flow is assumed to have ended in case the end call gets missed. We'll set it to60sas an example.max_concurrency: Configures the maximum number of concurrent requests that a service can take. We'll set it to2as an example.priority_label_key: This field specifies the label that is used to determine the priority. We will leave the label as it is.tokens_label_key: This field specifies the label that is used to determine tokens. We will leave the label as it is.workload_label_key: This field specifies the label that is used to determine the workload. We will leave the label as it is.control_point: It can be a particular feature or execution block within a service. We'll usemistral-promptas an example.
Here is how the complete values file would look:
# yaml-language-server: $schema=../../../../../blueprints/concurrency-scheduling/base/gen/definitions.json
blueprint: concurrency-scheduling/base
uri: ../../../../../blueprints
policy:
  policy_name: "mistral-concurrency-scheduling"
  components: []
  concurrency_scheduler:
    alerter:
      alert_name: "Too many inflight requests"
    concurrency_limiter:
      max_inflight_duration: "60s"
    max_concurrency: 2
    scheduler:
      priority_label_key: "priority"
      tokens_label_key: "tokens"
      workload_label_key: "workload"
    selectors:
      - control_point: "mistral-prompt"
  resources:
    flow_control:
      classifiers: []
The last step is to apply the policy using the following command:
aperturectl cloud blueprints apply --values-file=mistral-concurrency-scheduling.yaml
Next, we'll proceed to run an example to observe the newly implemented policy in action.
Test Run
We ran a local instance of Mistral using Ollama due to their straightforward installation process and accessible API for prompt submission.
Following installation, we developed a simple TypeScript application to send
prompts to Mistral. These prompts were integrated with Aperture's startFlow
and endFlow functions. To mimic real-world usage, we wrote two lists of
prompts to be used by paid and open source users. With around 10 users, each
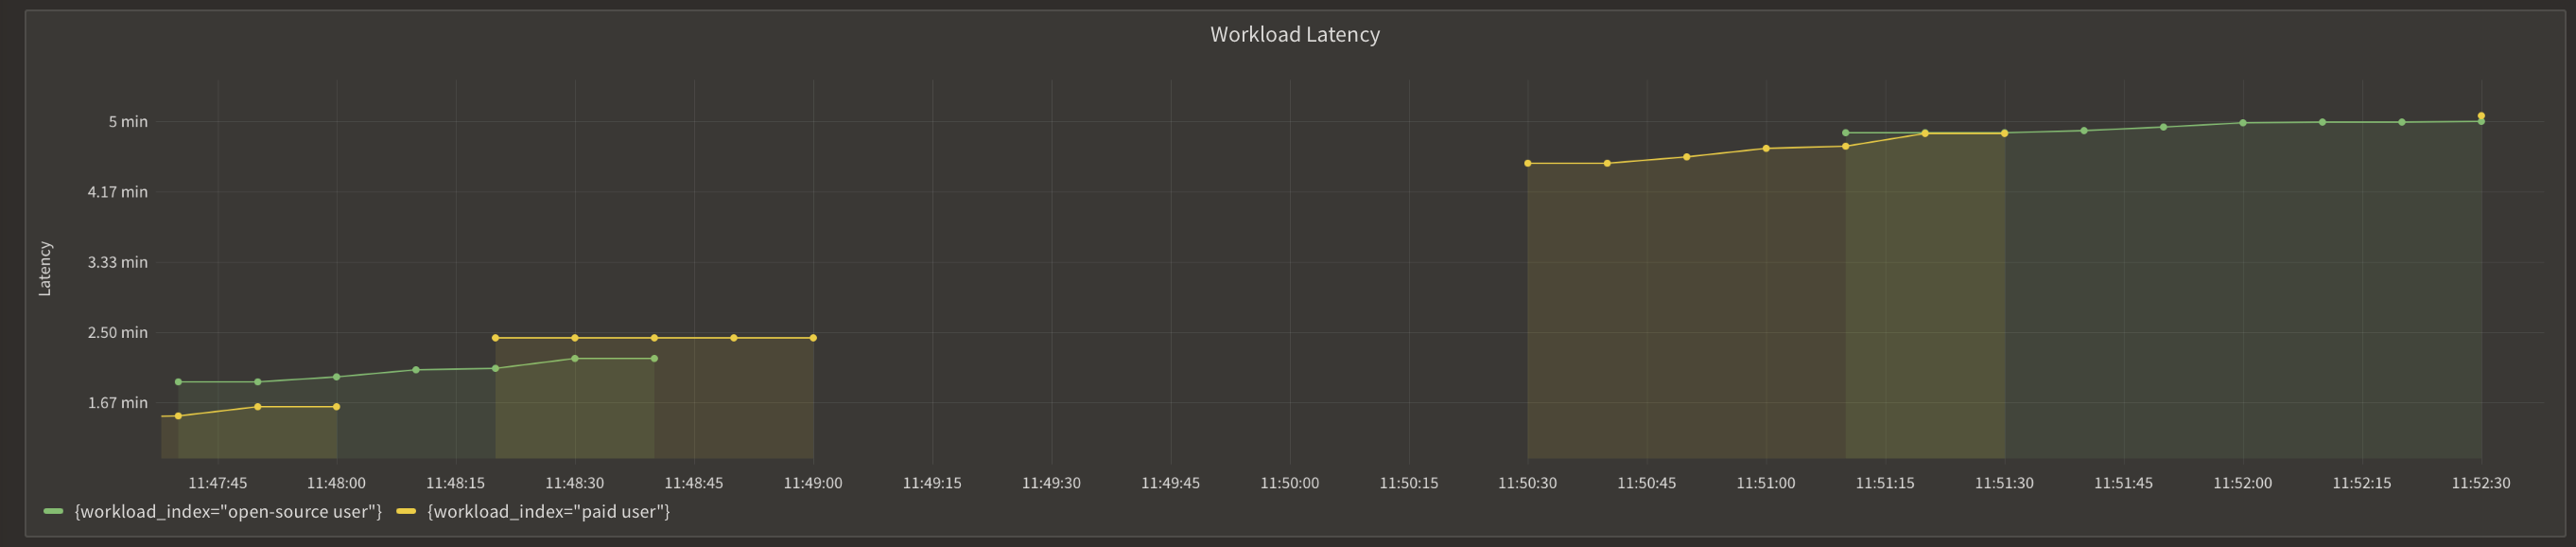
simultaneously sending 25 prompts to Mistral, we observed significant latency
differences. Without Aperture, the response time for generative AI workloads
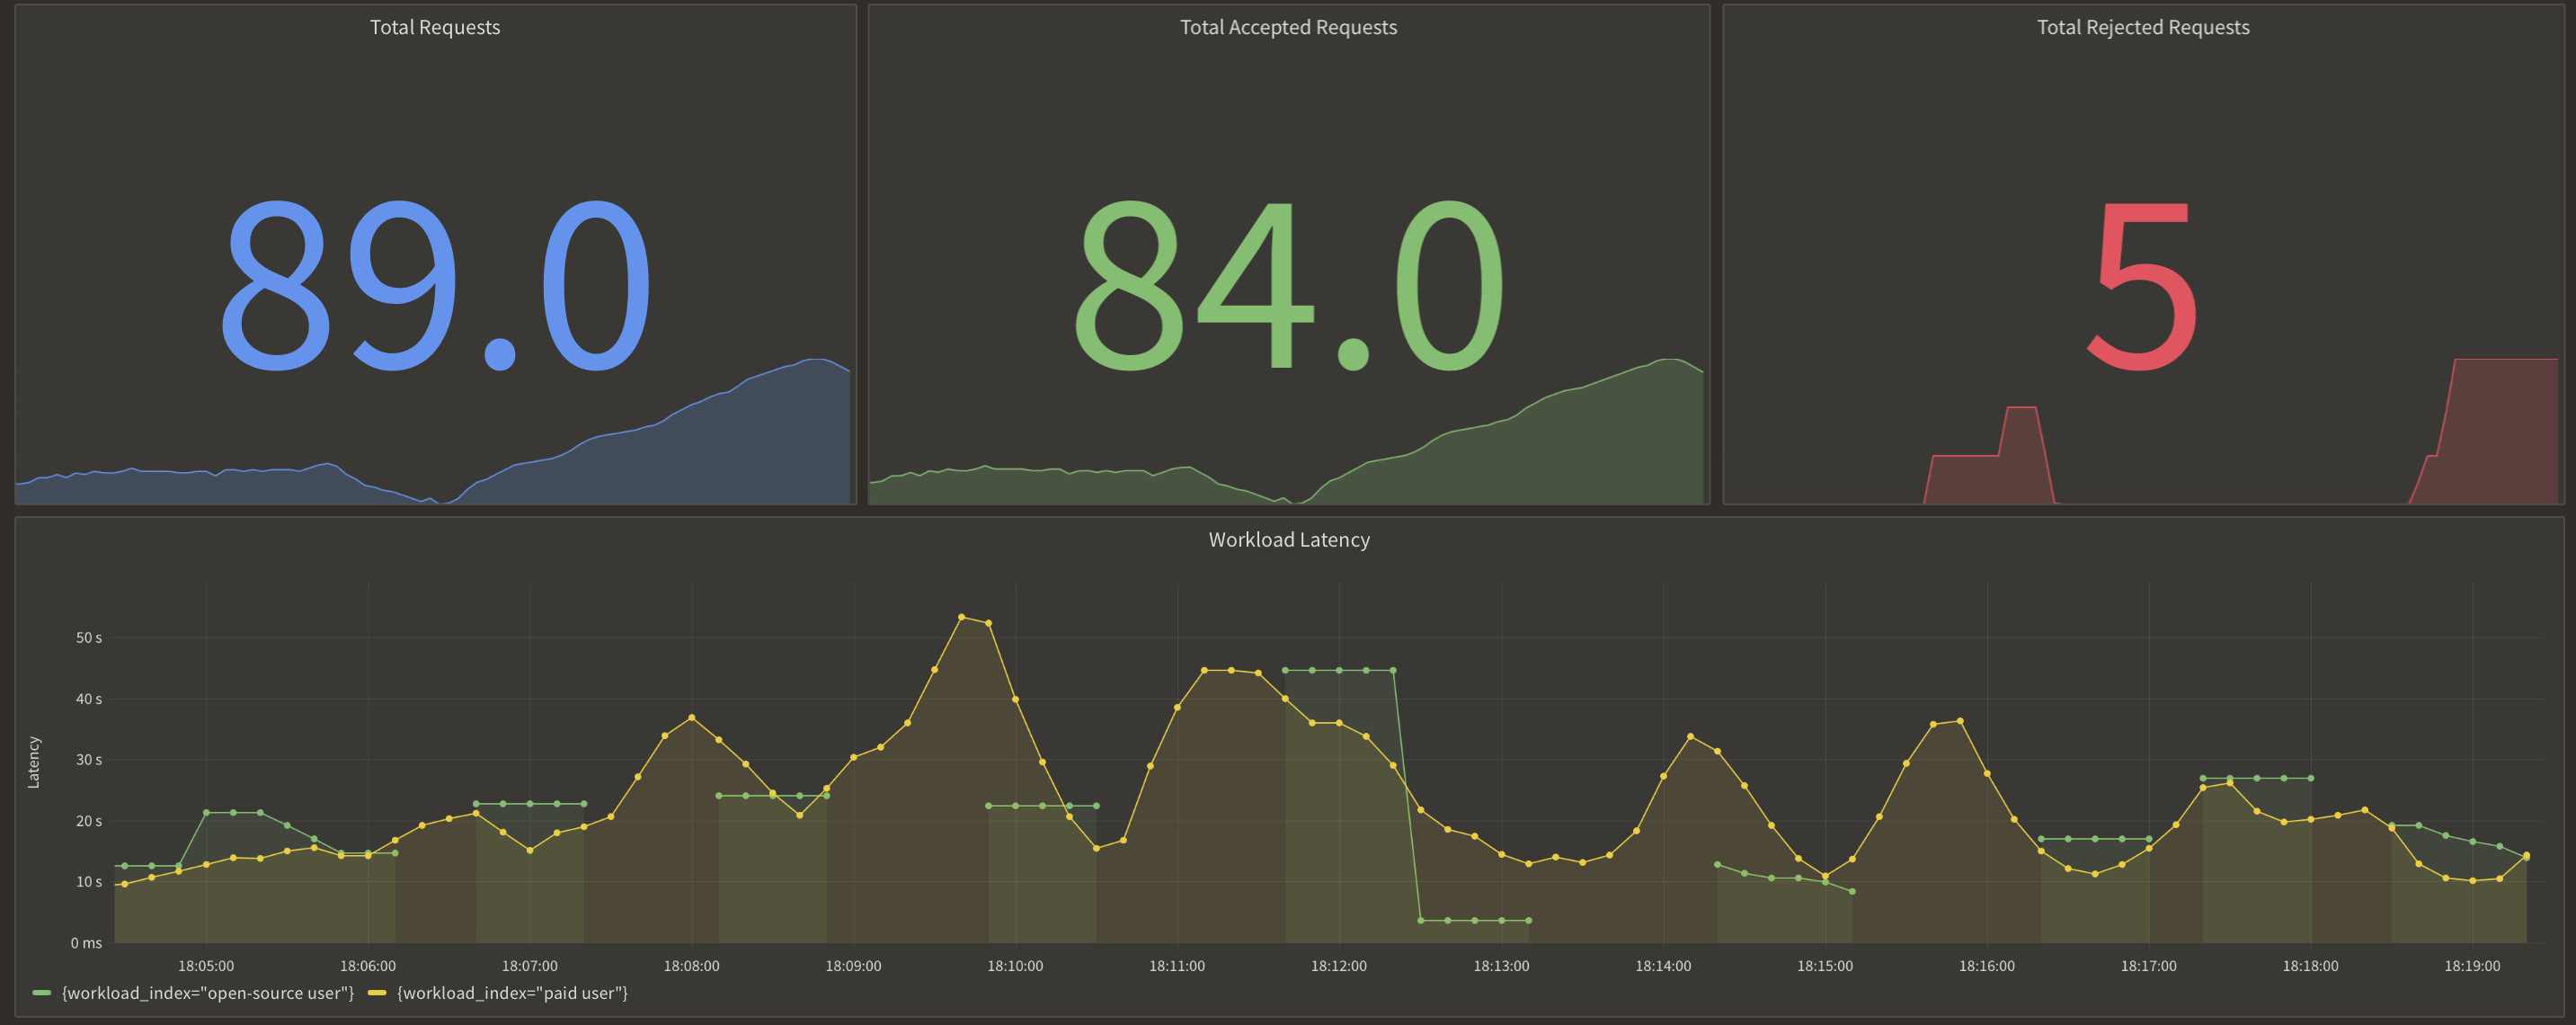
spiked up to 5 minutes and more. In contrast, with Aperture's concurrency
scheduling policy in place, not only was the latency reduced to as low as 50
seconds, but paying users also experienced much faster responses compared to
those using the open-source version due to paid users having a high priority.
Here is a comparison of the latencies before and after Aperture.
Before Aperture:
After Aperture:
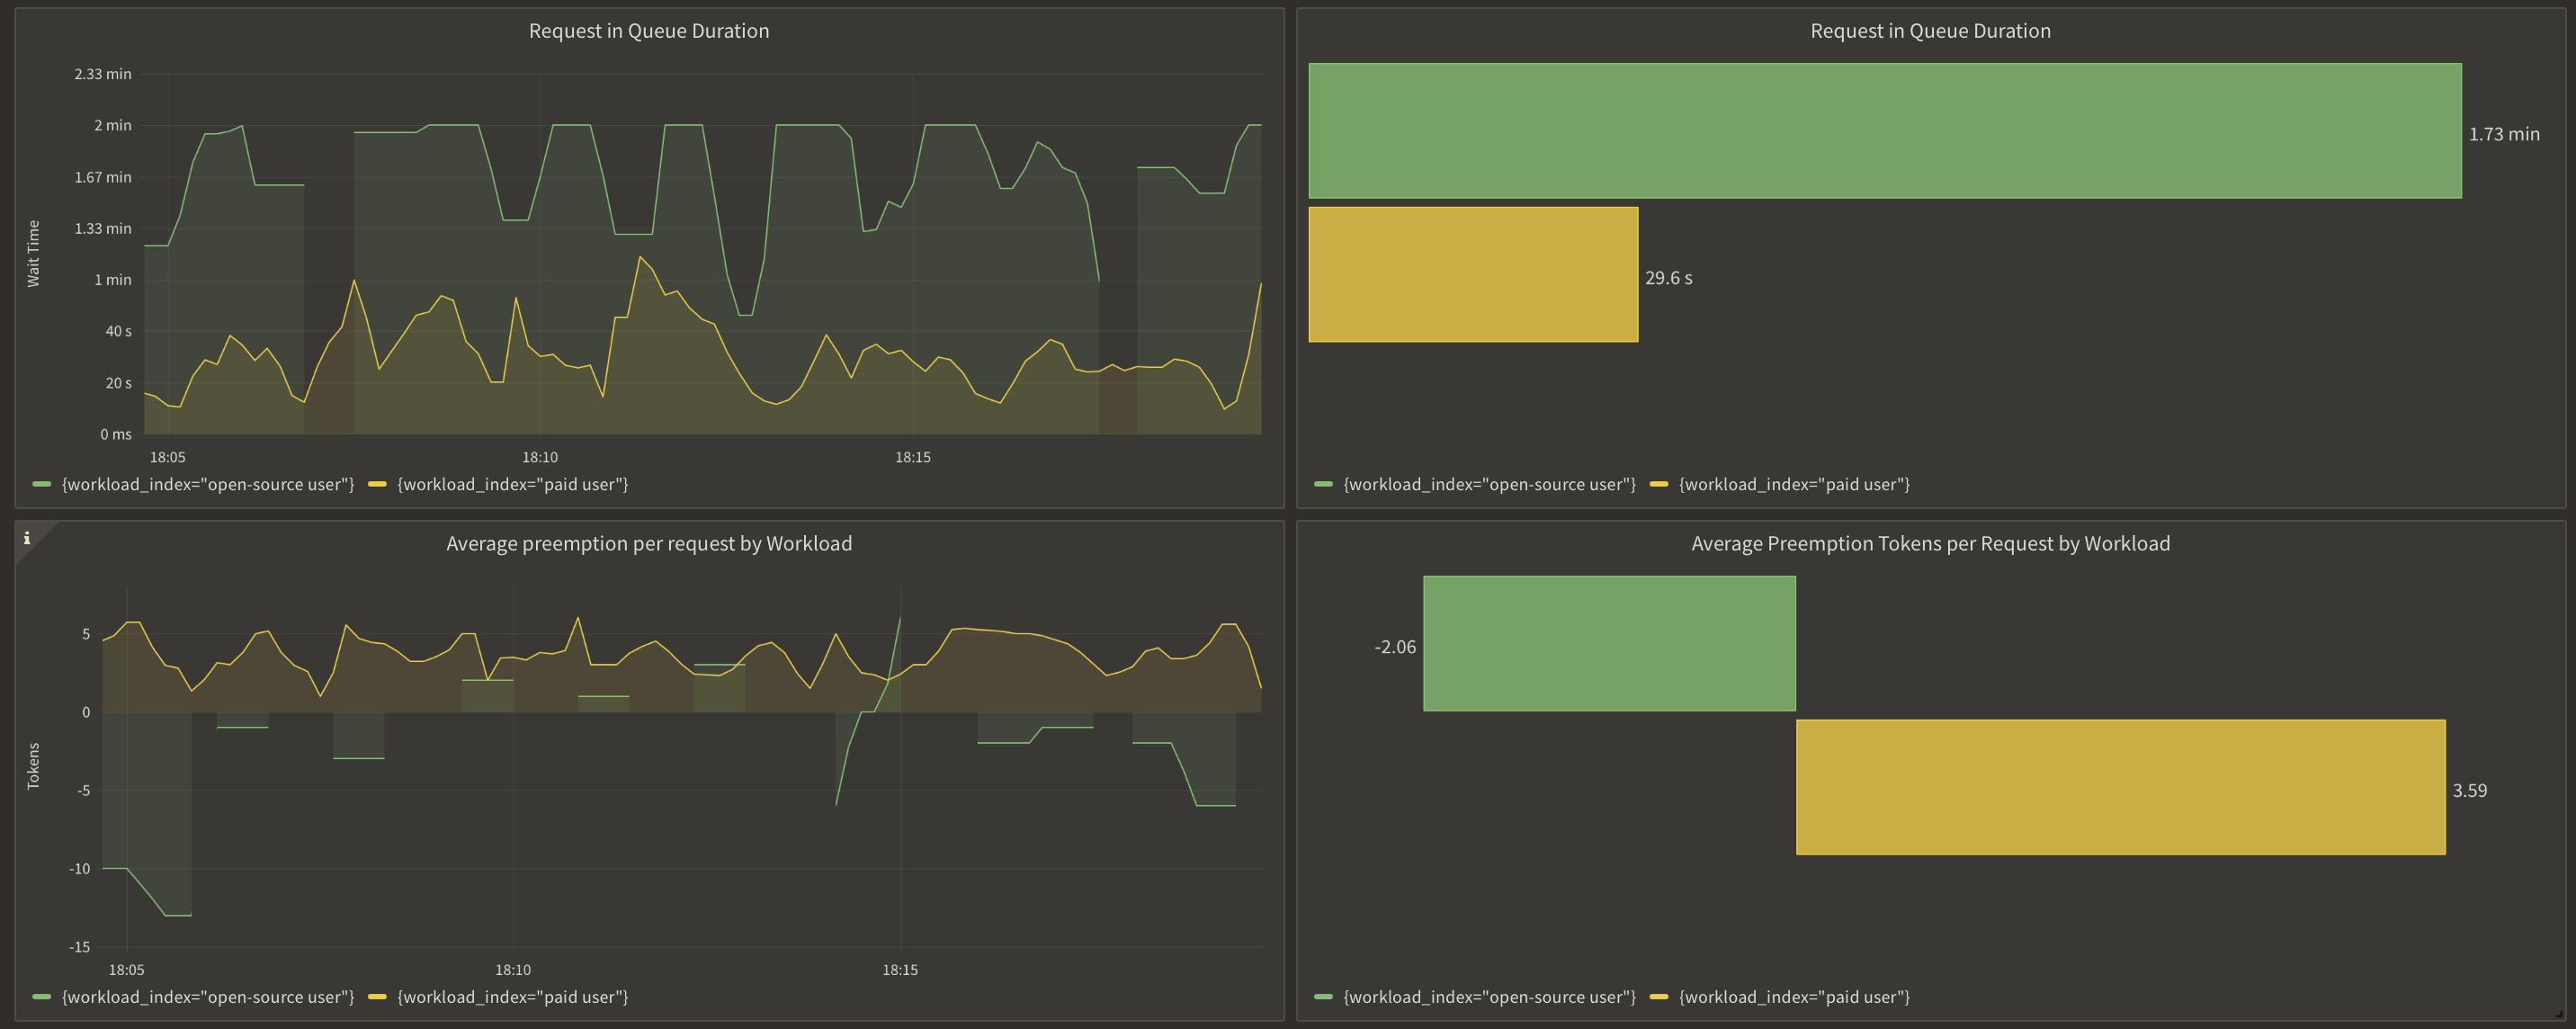
Here is the queueing and prioritization of requests when the max concurrency is met, and how it bumps up paid requests up in the queue.
In summary, whether you're operating Mistral as a service or using Mistral's API for app development, managing the load on LLMs remains a challenge, primarily due to GPU limitations impacting computation speed. Implementing Aperture's concurrency scheduling policy is essential as it ensures an optimal user experience while allowing to scale operations.