API Quota Management
The following policy is based on the Quota Scheduling blueprint.
Overview
Quota scheduling is a sophisticated technique that enables effective management of request quotas. This technique empowers services to enforce rate limits for outbound or external API. This helps ensure that services stay within allocated rate limits, therefore avoiding penalties, ensuring smooth and uninterrupted operation.
Moreover, quota scheduling optimizes the utilization of request quotas by prioritizing access based on business-critical workloads. This strategic prioritization ensures that the most crucial requests receive their fair share of request quotas, aligning API usage with business objectives and preventing cost overages.
The diagram provides an overview of quota scheduling in action, including the operation of the token bucket to assign tokens based on priority.
Requests coming into the system are categorized into different workloads, each of which is defined by its priority and weight. This classification is crucial for the request scheduling process.
The scheduler prioritizes request admission based on two factors: the priority and weight assigned to the corresponding workload, and the availability of tokens from the token bucket. This mechanism ensures that high-priority requests are handled appropriately even under high load or when the request rate is close to the rate limit.
Before exploring Aperture's quota scheduling capabilities, make sure that you have signed up to Aperture Cloud and set up an organization. For more information on how to sign up, follow our step-by-step guide.
Quota Scheduling with Aperture SDK
The first step to using the Aperture SDK is to import and set up Aperture Client:
- TypeScript
You can obtain your organization address and API Key within the Aperture Cloud
UI by clicking the Aperture tab in the sidebar menu.
The next step consists of setting up essential business labels to prioritize requests when making calls to third-party APIs and effectively avoid hitting their rate limits. For example, requests can be prioritized by user tier classifications:
- Typescript
The next step is making a startFlow call to Aperture. For this call, it is
important to specify the control point (quota-scheduling-feature in our
example) and the labels that will align with the quota scheduling policy. The
priority label is necessary for request prioritization, while the workload
label differentiates each request. In this example, we're only tracking and
logging requests sent to Aperture. However, after making the startFlow call,
you can execute relevant business operations.
According to the policy logic designed to prevent third-party API rate limit
breaches, Aperture will, on each startFlow call, either give precedence to a
critical request or queue a less urgent one when approaching API limits. The
duration a request remains in the queue is determined by the gRPC deadline, set
within the startFlow call. Setting this deadline to 120000 milliseconds, for
example, indicates that the request can be queued for a maximum of 2 minutes.
After this interval, the request will either be processed or discarded,
depending on its position in the queue.
- TypeScript
It is important to make the end call made after processing each request, in
order to send telemetry data that would provide granular visibility for each
flow.
Create a Quota Scheduling Policy
- Aperture Cloud UI
- aperturectl
Navigate to the Policies tab on the sidebar menu, and select Create Policy
in the upper-right corner. Next, choose the Request Prioritization blueprint,
and from the drop-down options select Quota based. Now, complete the form with
these specific values:
Policy name: Unique for each policy, this field can be used to define policies tailored for different use cases. Set the policy name toquota-scheduling-test.Fill amount: Configures the number of tokens added to the bucket within the selected interval. SetFill amountto15.Bucket Capacity: Defines the maximum capacity of the bucket in the rate limiter. Clear the optionsame value for bucket capacity optionto set value as30.Interval: Specifies the time amount of timeFill amountwill take to refill tokens in the bucket. SetIntervalto1 minute.Limit By Label Key: Determines the specific label key used for enforcing rate limits. We'll useuser_idas an example.Priority label key: This field specifies the label that is used to determine the priority. It is set topriorityin the policy and SDK code example.Workload label key: This field specifies the label that is used to determine the workload. It is set toworkloadin the policy and SDK code example.Control point: It can be a particular feature or execution block within a service. We'll usequota-scheduling-featureas an example.

Once you've completed these fields, click Continue and then Apply Policy to
finalize the policy setup.
If you haven't installed aperturectl yet, begin by following the Set up CLI aperturectl guide. Once aperturectl is installed, generate the values file necessary for creating the quota scheduling policy using the command below:
aperturectl blueprints values --name=quota-scheduling/base --output-file=quota-scheduling-test.yaml
Following are the fields that need to be filled for creating a quota scheduling policy:
policy_name: Unique for each policy, this field can be used to define policies tailored for different use cases. Set the policy name toquota-scheduling-test.bucket_capacity: Defines the maximum capacity of the bucket in the rate limiter. Setbucket_capacityto30.fill_amount: Configures the number of tokens added to the bucket within the selected interval. SetFill amountto15.interval: Specifies the time amount of timeFill amountwill take to refill tokens in the bucket. SetIntervalto60 seconds.limit_by_label_key: Determines the specific label key used for enforcing rate limits. We'll useuser_idas an example.priority_label_key: This field specifies the label that is used to determine the priority. It is set topriorityin the policy and SDK code example.workload_label_key: This field specifies the label that is used to determine the workload. It is set toworkloadin the policy and SDK code example.control_point: It can be a particular feature or execution block within a service. We'll usequota-scheduling-featureas an example.
Here is how the complete values file would look:
# yaml-language-server: $schema=../../../../../blueprints/quota-scheduling/base/gen/definitions.json
blueprint: quota-scheduling/base
uri: ../../../../../blueprints
policy:

  policy_name: "quota-scheduling-test"
  quota_scheduler:
    bucket_capacity: 30
    fill_amount: 15
    rate_limiter:
      interval: 60s
      limit_by_label_key: "user_id"
    scheduler:
      priority_label_key: "priority"
      workload_label_key: "workload"
    selectors:
      - control_point: "quota-scheduling-feature"
The last step is to apply the policy using the following command:
aperturectl cloud blueprints apply --values-file=quota-scheduling-test.yaml
Next, we'll proceed to run an example to observe the newly implemented policy in action.
Quota Scheduling in Action
Begin by cloning the
Aperture JS SDK. Look for the
quota_scheduler_example.ts in the example directory within the SDK.
Switch to the example directory and follow these steps to run the example:
- Install the necessary packages:
- Run
npm installto install the base dependencies. - Run
npm install @fluxninja/aperture-jsto install the Aperture SDK.
- Run
- Run
npx tscto compile the TypeScript example. - Run
node dist/quota_scheduler_example.jsto start the compiled example.
Once the example is running, it will prompt you for your Organization address and API Key. In the Aperture Cloud UI, select the Aperture tab from the sidebar menu. Copy and enter both your Organization address and API Key to establish a connection between the SDK and Aperture Cloud.
Monitoring Quota Scheduling Policy
After running the example for a few minutes, you can review the telemetry data
in the Aperture Cloud UI. Navigate to the Aperture Cloud UI, and click the
Policies tab located in the sidebar menu. Then, select the
quota-scheduling-test policy that you previously created.
Once you've clicked on the policy, you will see the following dashboard:
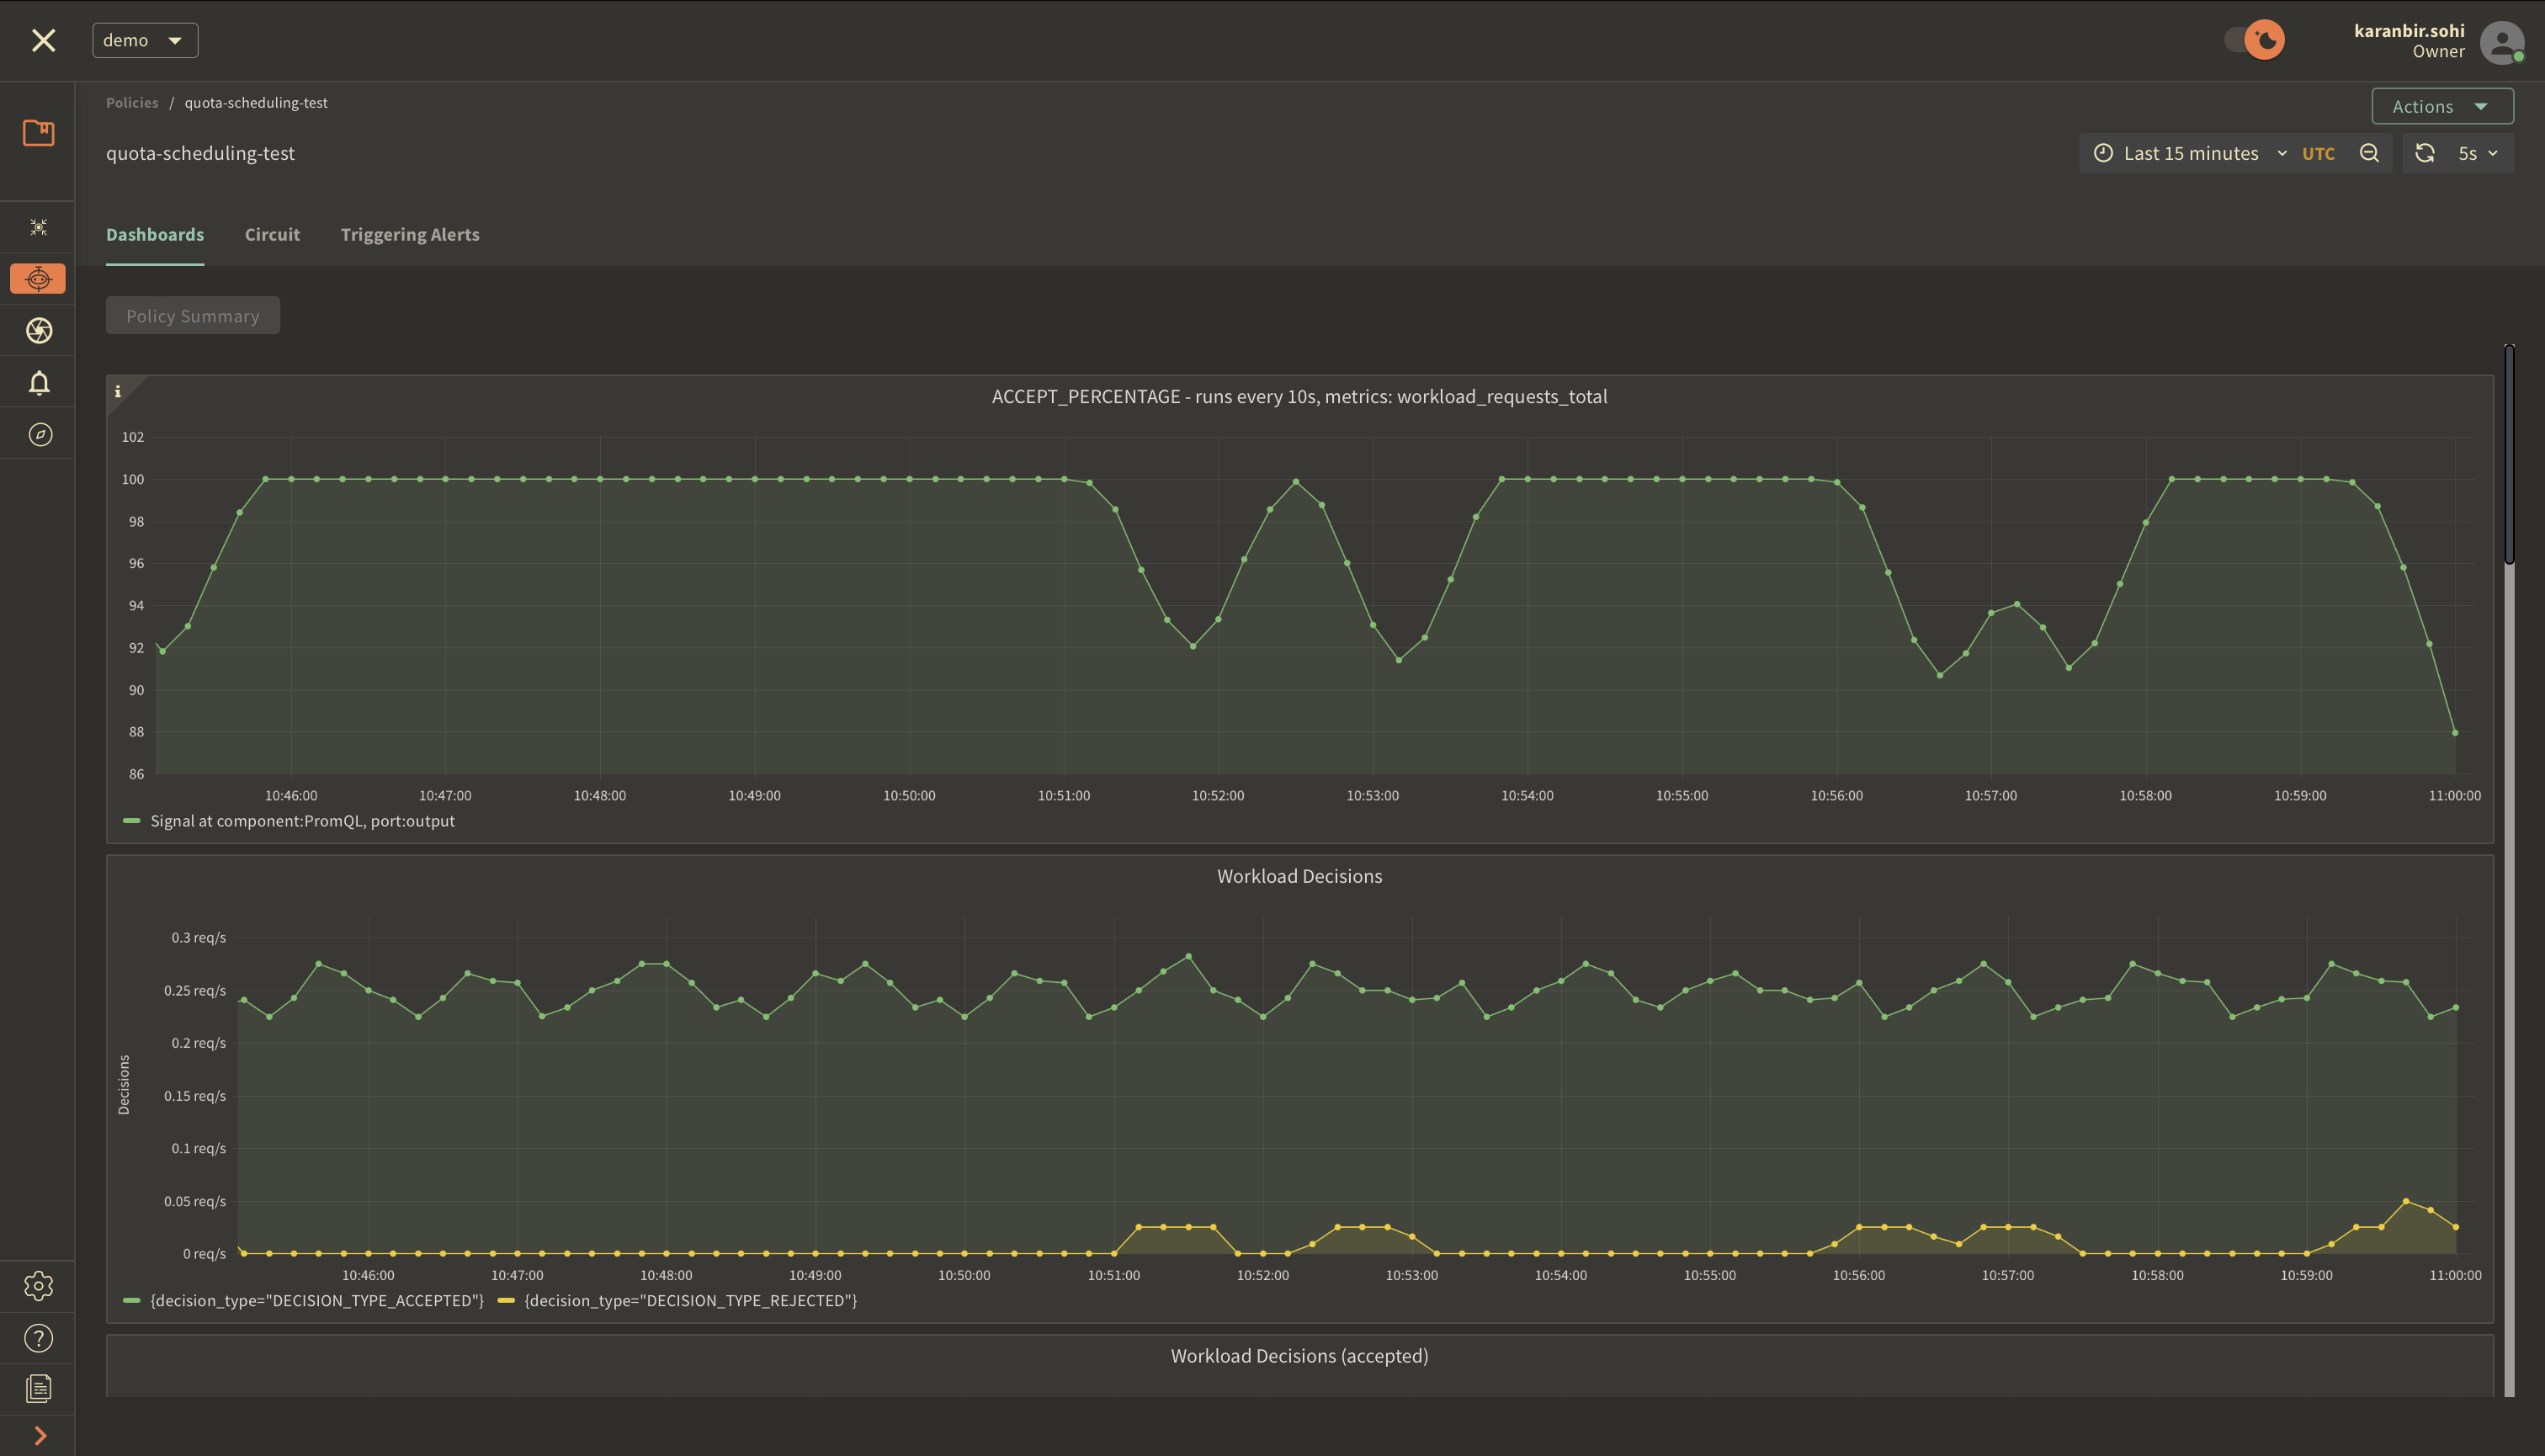
The two panels above provide insights into how the policy is performing by monitoring the number of accepted and rejected requests along with the acceptance percentage.
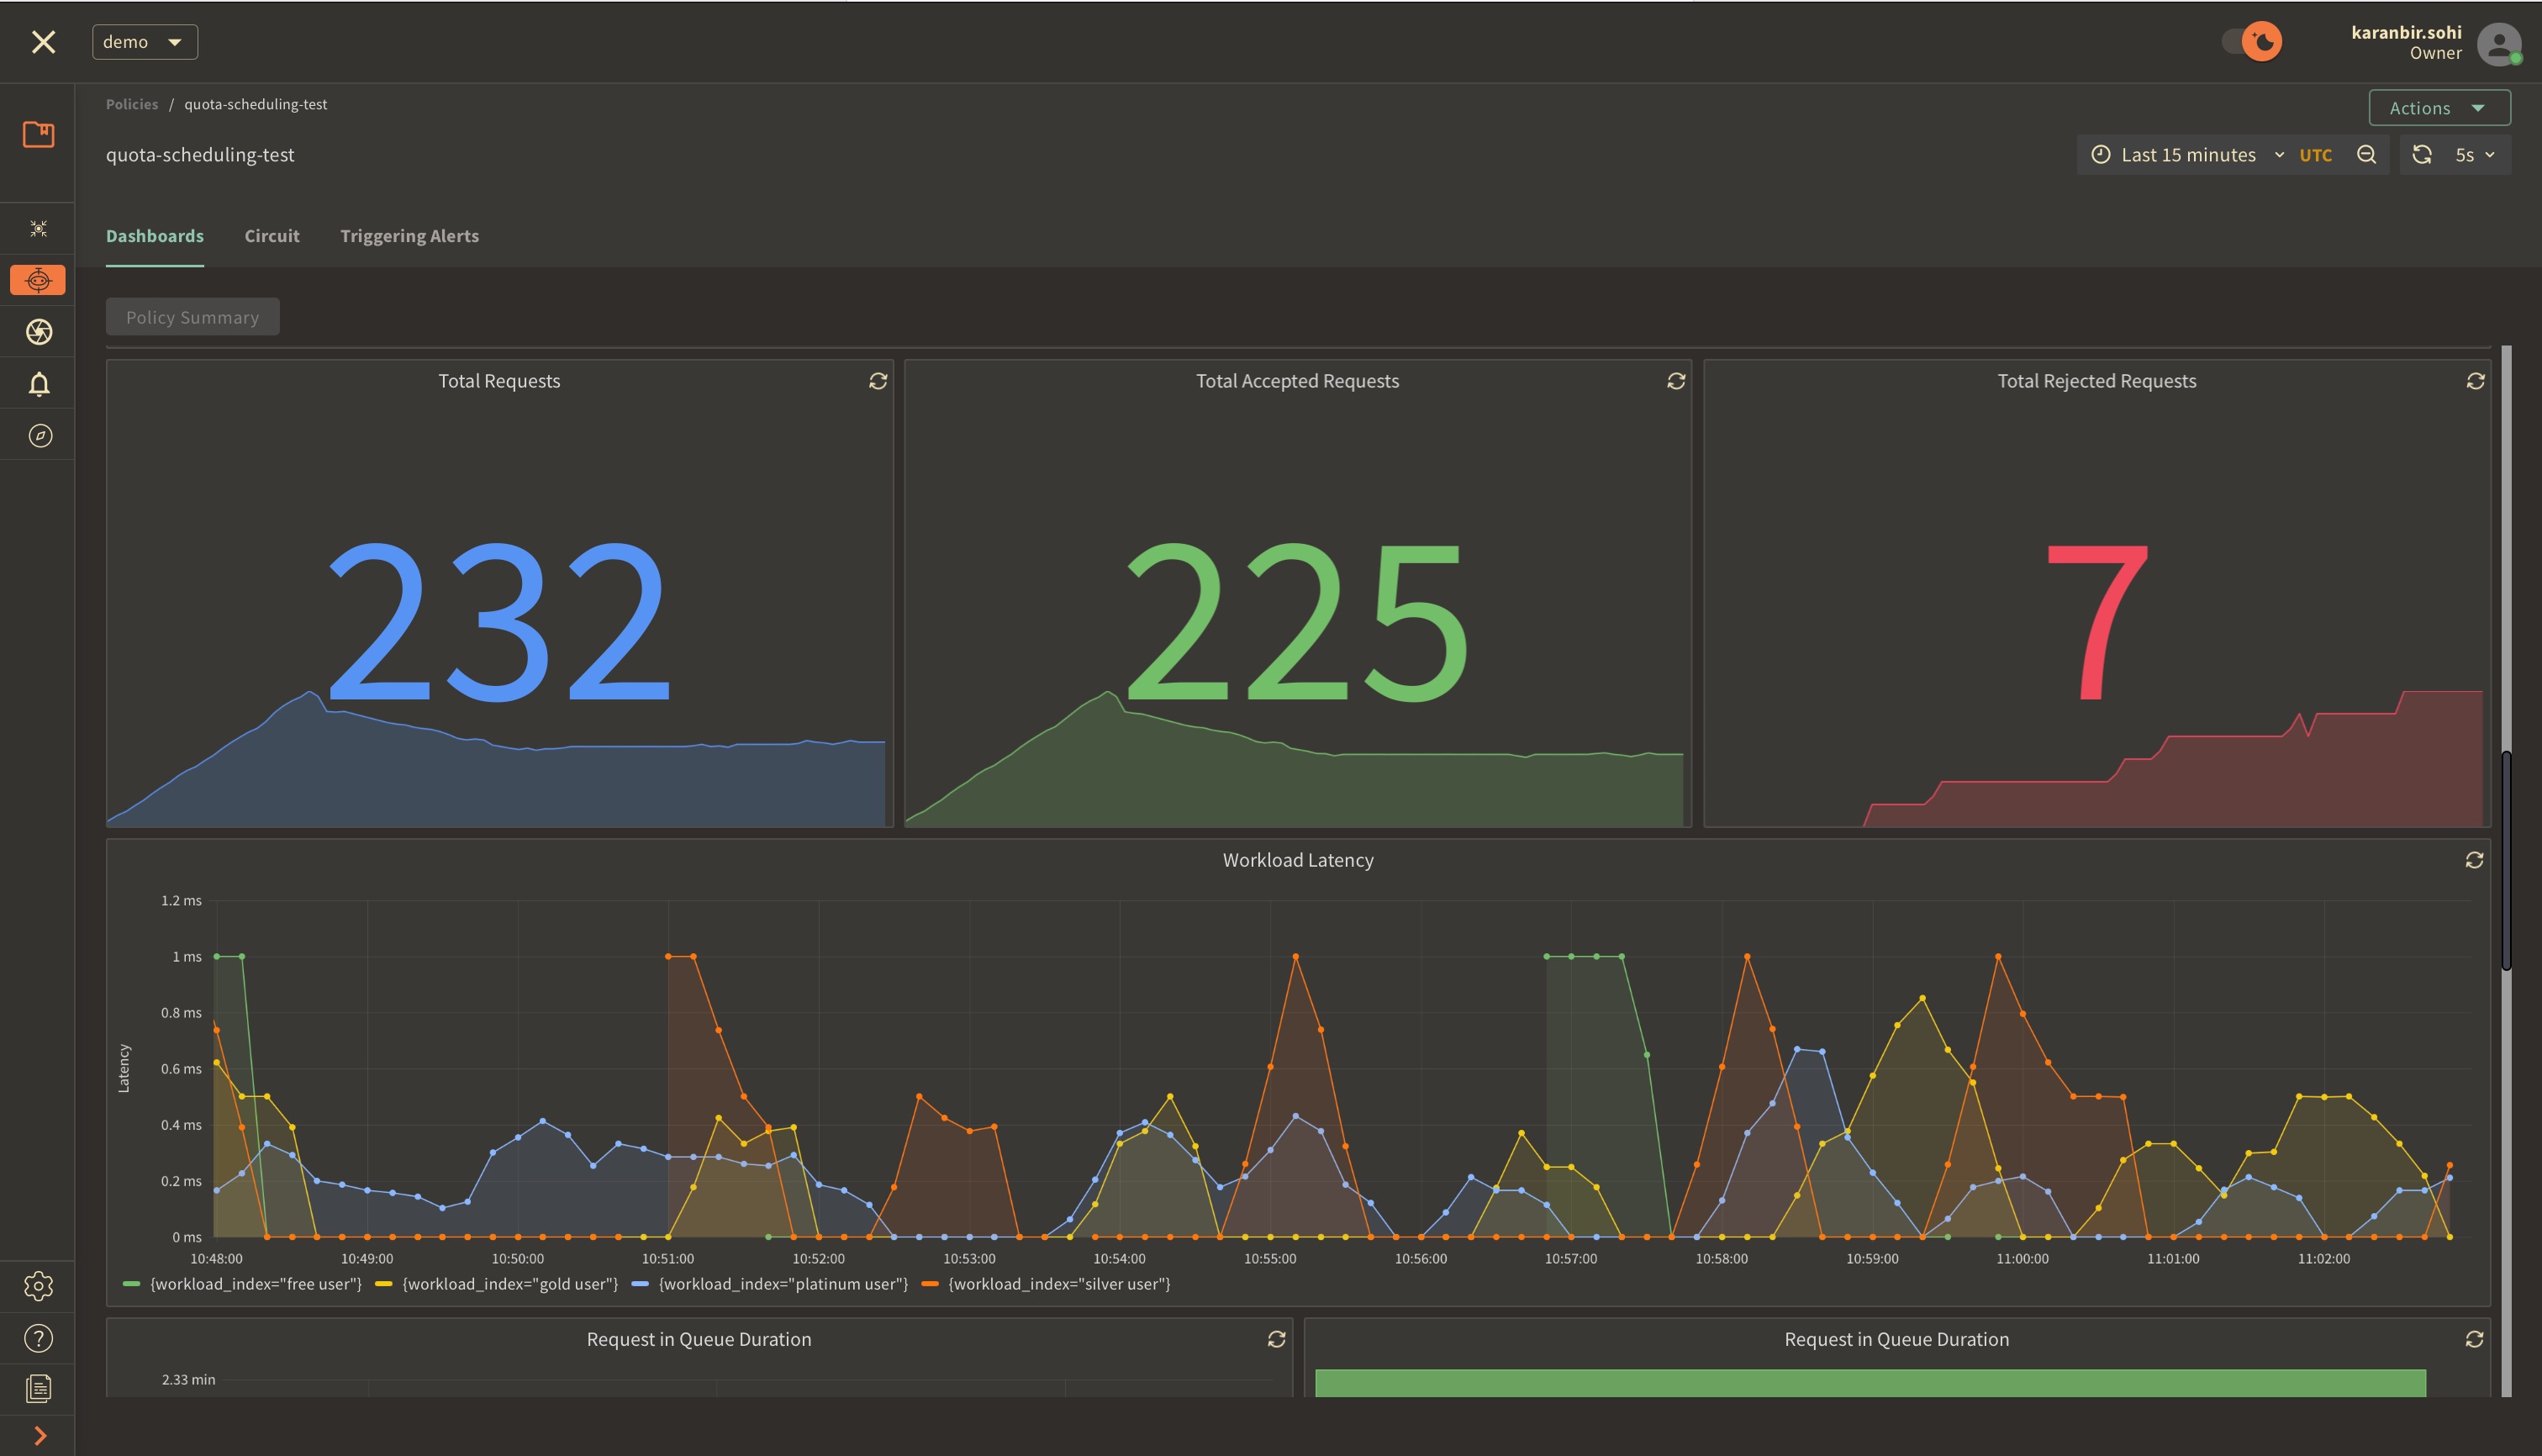
The panels above offer insights into the request details, including their latency.
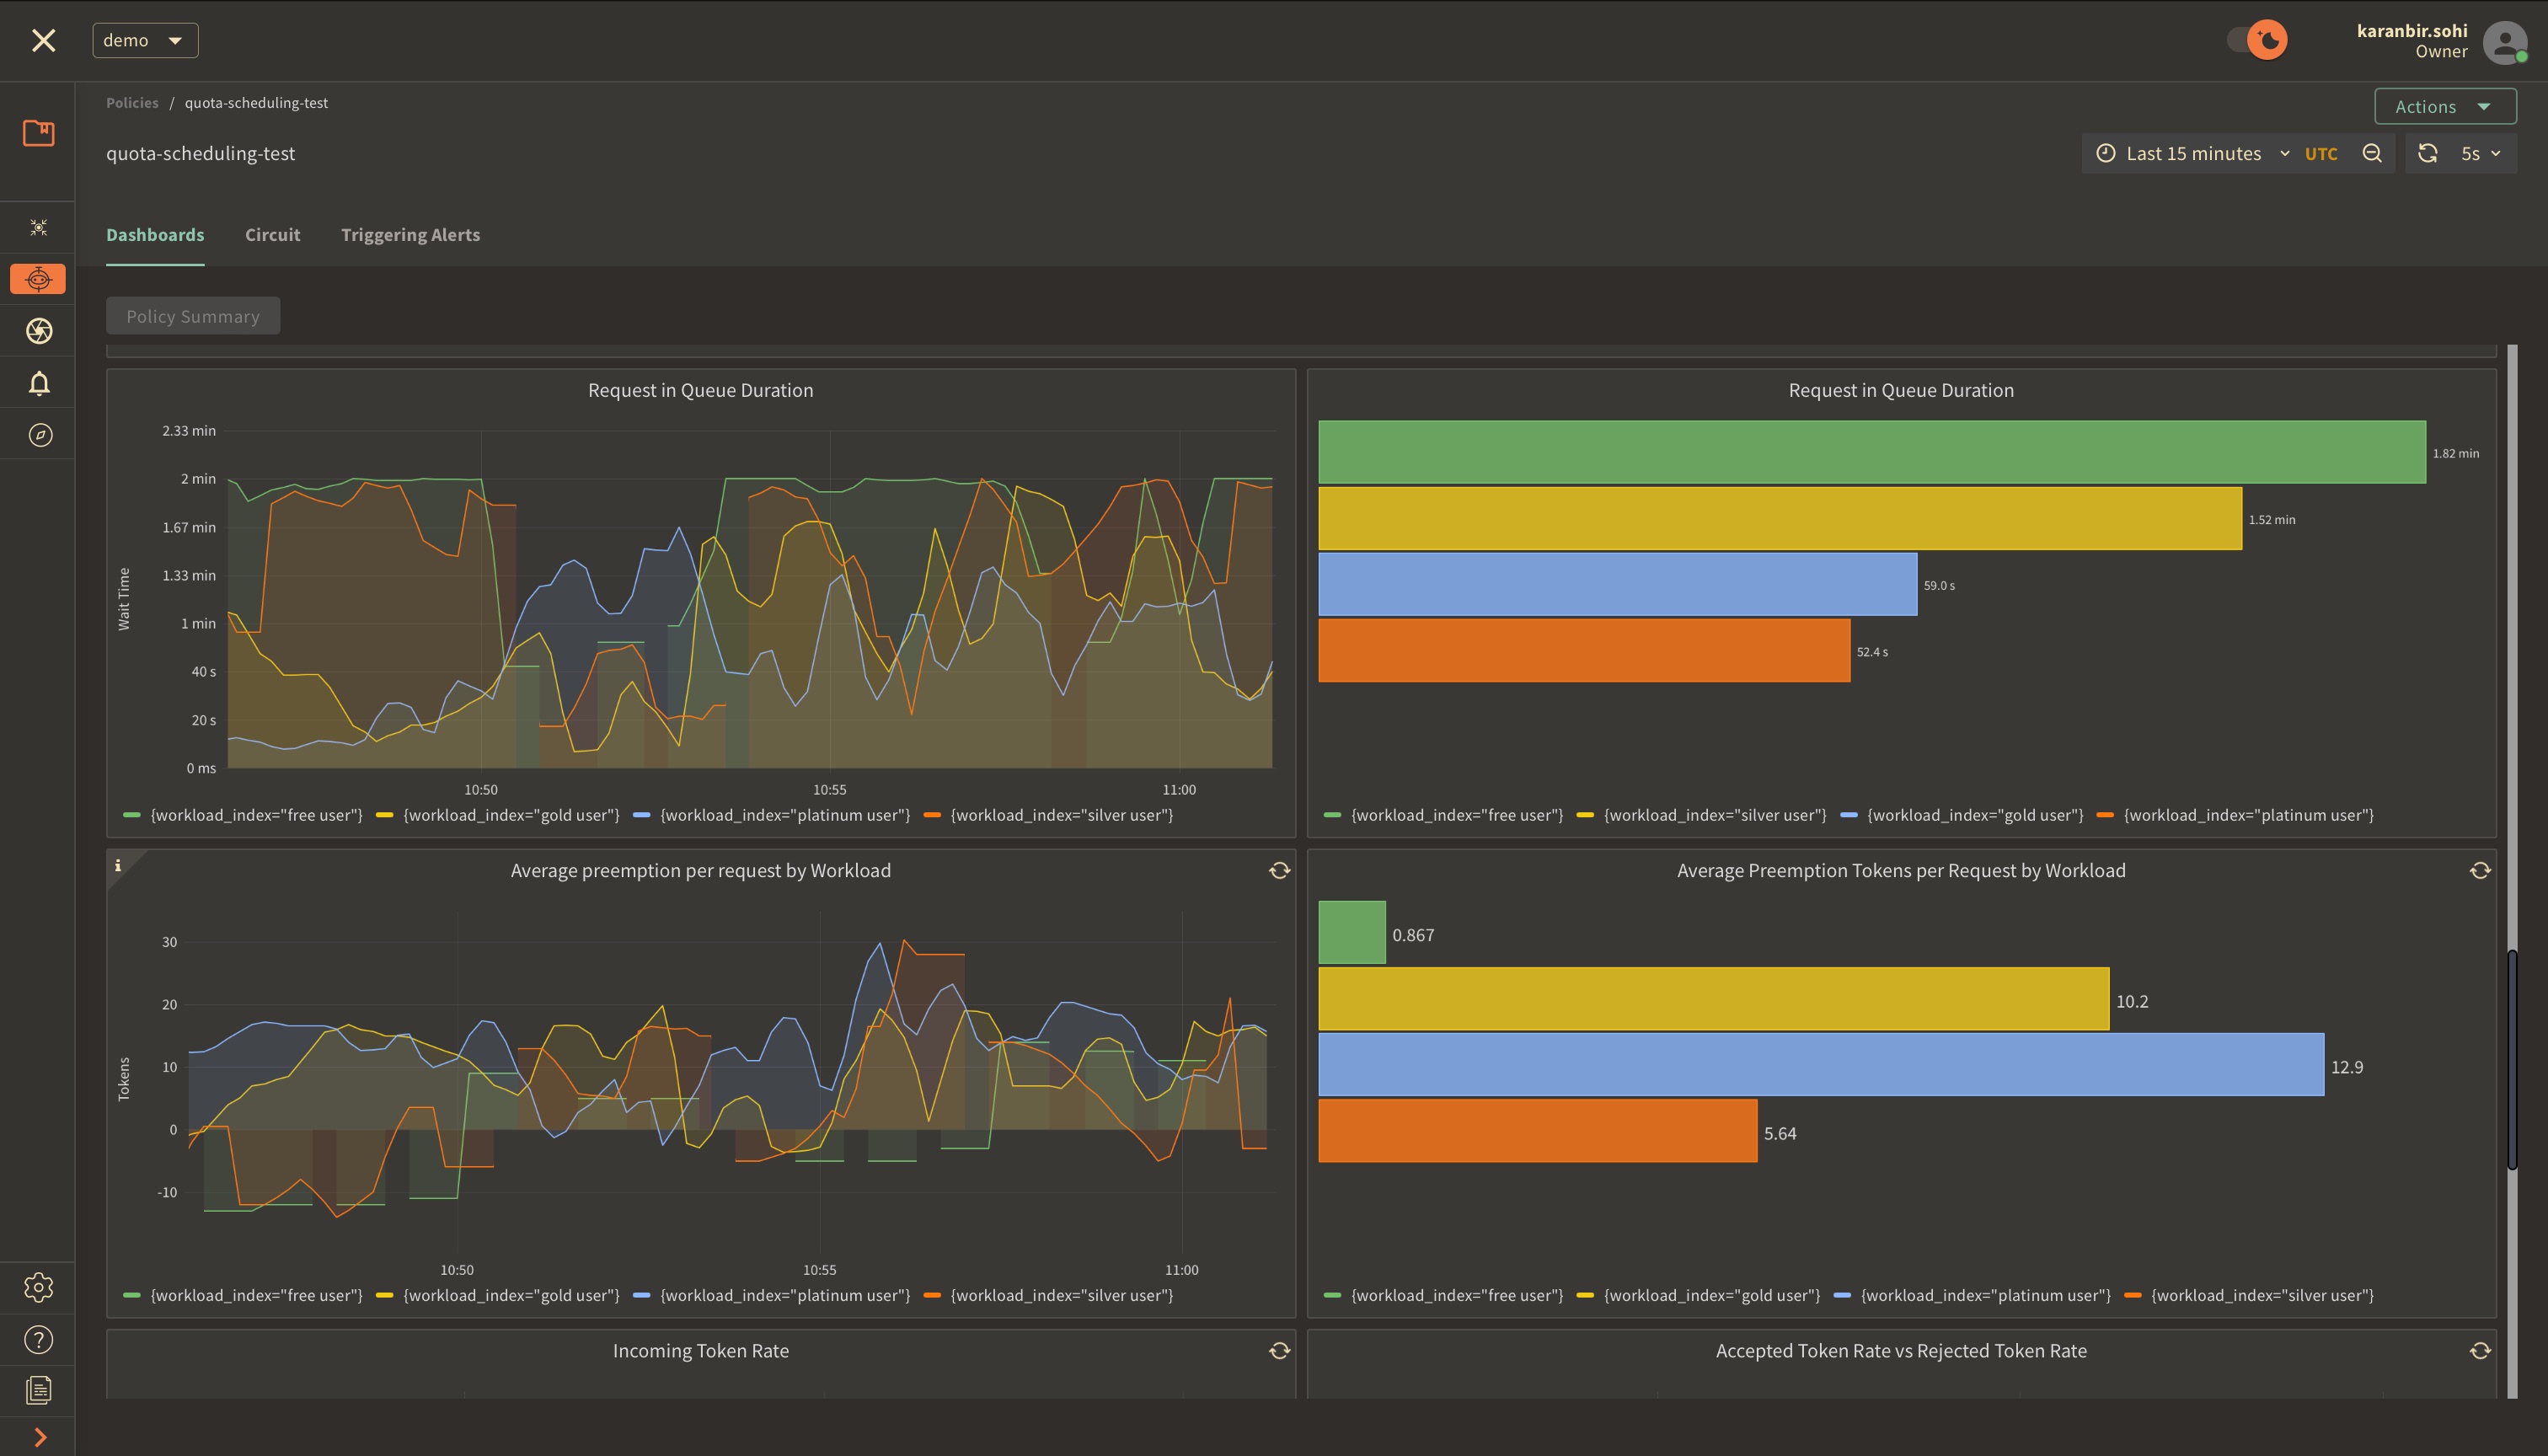
These panels display insights into queue duration for workload requests and
highlight the average of prioritized requests that moved ahead in the queue.
Preemption for each token is measured as the average number of tokens a request
belonging to a specific workload gets preempted in the queue.